Wednesday, November 30, 2011

Faux Mercury Glass Ornaments

I wanted to share the ornaments I created with a faux mercury glass look.
I followed the same technique as I showed HERE but used
Black Soot and Silver Mixative alcohol inks.
First choose a glass ornament.  The technique works on either clear or white glass.  I think the white glass works a little better than the clear for this technique.
First pounce black AI all over the ornament and let dry well.
Then pounce on the silver AI here and there.  After that dries, do a few more layers, varying the thickness of the silver.  Be sure not to cover up all the black.
Below you see the clear glass ornament done the same way as my previous ornament.  For the center I punched the santa and base circle from Tim Holtz's Seasonal Paper Stash.  I went over the red background circle with Fired Brick Distress Stickles.  I used a thick coat of Clear Rock Candy Distress Crackle Paint on the center.  After that was dry, I put Glossy Accents over it.
I cut a tag from gray cardstock and distressed it with Walnut Stain Distress Inks and stamped the sentiment in Fired Brick DI.  Using thin wire, I attached the tag and an old jingle bell to the ornament hanger.
I'm still working on finishing the rounded bulb ornament and will share that soon.

I've entered this ornament in the following Challenge:

Monday, November 28, 2011

Super Deals on Distress Inks & Tim Holtz Products

My credit card has been getting a workout on Cyber Monday. 
And you know what's sad?  It hasn't been gifts...it's all for me!

Have you checked out the new BLITSY shop?
I just got Glossy Accents for $2.99!
And the new Tim Holtz Winter Limited Edition Distress Inks for just $8.97, which I couldn't pass up even though my ink box is filled to capacity!  Also picked up some Christmas adorments.  Good pricing on the Trinket & Cargo cases as well.
Not an employee of Blitsy, just happy to pass along the great deals to my followers.

Saturday, November 26, 2011

A "Naughty" Collage

 I kind of veered off of the Christmas path a bit with this collage...
I guess it sort of fits into the "naughty or nice" theme however! LOL
This collage started off with me wanting to use the great image of the lady, originally part of a vintage circus photo.  Something about her stern expression made me think she had other ideas of putting that whip to use.  My sister suggested the lyrics from the Rihanna song "S & M" and the piece came together!
The base is an 8" x 10" canvas panel.  I used paint and inks to create the background then layered with paper from the Tim Holtz stack, dictionary page copies, glassine paper and the heading that I created and printed using Photo Shop.  I had fun "blinging" up my gal:  Netting, chain and a silk flower on her hat.  Stickles buttons.  Chains and a lock charm at the waist.  Leather lacing for the whip. 
I accented everything with Distress Inks and a water pen.
I created the "Pain" and "Pleasure" tickets using a Tim Holtz stamp.  Finished up the piece by adding more chains to accent the wording, metal corners and the large flower.
Sometimes I think it's okay to get a little naughty, don't you?

This piece has been entered into the
Challenge


Friday, November 25, 2011

Vintage Santa Ornament with Tutorial

Here's a fast and easy ornament project with the rich look of copper and gold.
The hardest part of this project just may be finding the glass ornaments.  I found these while on a shopping trip to the MARY MAXIM Outlet in Port Huron, Michigan.  I only bought two boxes and wish I had gotten more!  I tried to find them online again but couldn't.  They are manufactured by http://www.sierrapacificcrafts.org/ and if you go to their website you can search for a retailer in your state.  It looks like Pat Catan's and Ben Franklin stores carry their product so you may be able to find them there.  These are unique because they are 2.25" round but each side is flat making them perfect for paper crafting. 
Here's how to create the ornament:
1.  Using alcohol inks, apply to a felt pad on the blending tool and pounce all over the back and half the side of the ornament.  Once dry, do the other half of the side and the back. 
2.  Using an book page, punch a 1.75" circle.  Use the blending tool and a foam pad to distress the circle with Vintage Photo Distress Ink.  Stamp the santa image onto a scrap piece of beige cardstock  with Archival Ink then punch out the image with a 1.5" round punch.  Fussy cut the top and sides of the image out, leaving the bottom portion rounded.  You can leave the image as is or add color.  (I  used a bit of Fired Brick Distress Inks and a water pen to add a touch of color to his hat and coat.  I did the same thing to his face with Vintage Photo.)
 3.  Using a glue stick, attach the santa cutout to the book paper circle.  Attach this element to the ornament with a thin coat of Glossy Accents.  Once dry, add a border of Stickles.  HINT:  Instead of trying to make a perfect circle squeezing out a continuous line, create the circle using small dots of Stickles next to each other.  Much easier to control!
4.  Once the Stickles are dry, fill in the circle with Glossy Accents.  Sprinkle glitter over the GA in the areas around the santa and let dry completely...usually over night. 
5.  Create the Fragment tag by stamping the sentiment on a scrap piece of book page with Archival Ink.  Apply a thin coat of Glossy Accents to the paper and press on the tag.  Let dry.  Trim paper from around tag and from tag hole.  Using the same alcohol inks as on ornament, apply to tag edges and back.  Cut a length of copper wire and attach tag to the ornament loop.  Curl the ends of the wire with a brush handle or dowel.  Tie on scrap of ribbon.

I'm working on another project I'll be sharing using these glass ornaments. 
Here's a hint:  faux mercury glass!

Supply List:
*Glass Ornament
*Alcohol inks--Latte, Caramel, Ginger, Gold Mixative
*Distress Inks--Vintage Photo, Fired Brick
*Stickles--Vintage Photo
*Glitter--Martha Stewart "Bronze"
*Tim Holtz "Fragments" tag
*Old book page
*Circle Punches--1.75" and 1.5"
*Stamp--"Vintage Christmas" by Crafty Secrets
*Scrap piece of beige cardstock
*Archival Ink-Coffee
*Glossy Accents
*Copper wire
*Bronze ribbon-7"
*Misc--Tonic Scissors, Blending Tool with felt & foam pads, disposable gloves, glue stick, water pen

Thursday, November 24, 2011

Happy Thanksgiving!

I've been working up lots to share with you but during the holidays, family comes first.
Stay tuned...another new glass ornament tutorial, more domino ornaments to share and of course, free SVGs are coming up soon! 
So many ideas...so little time....

Monday, November 21, 2011

Attention Sizzix Eclips Owners

If you are interested in Sure Cuts A Lot (SCAL) the program I use to cut all my SVG files, I just received this announcement from Craft Edge (maker of SCAL):

We have teamed up with Sizzix to release an exclusive version of our SCAL
software, called "eCAL", that works with the Sizzix eclips machine.

eCAL has the same great features of SCAL plus more to take advantage of
features of the Sizzix eclips, such as cutting and scoring in a single
pass, and Laser cut preview for less paper waste.

eCAL is currently on sale at a special introductory price for a limited
time at
<http://www.craftedge.com/purchase/craftedge/purchase_ecal.html>


I don't own an eclips or work for Craft Edge.  Just passing the word on so that more people discover the awesome and amazing world of SVG files!

Sunday, November 20, 2011

Rolled Rose Card

Creative Team member Bonnie shared another beautiful card she created using my "Rolled Roses" file:
Bonne says that she makes up a bunch of them at one sitting and then saves them for quick card making.   You can get all the details on the card on Bonnie's BLOG
Here's a close up of that beautiful flower: 
If you'd like to get the file for yourself, click HERE.
Also, this is the final day to enter the
Creative Challenge.  Lots of great prizes! 
Check out the details HERE.

Thursday, November 17, 2011

Merry Olde Christmas Card & SVG: Big Ben


If you know me either personally or through this blog, you know that I am an English Bulldog lover.  I've had three of these wonderful dogs, with Millie currently enjoying the position of top dog in the house.  So, as the featured designer November 18th on Card A Day Blog I needed to create a card following the "Christmas Around the World" theme. 
There was only one choice... a card with an English feel that I could feature a bulldog on!

I have quite a few bulldog stamps but the one I picked to use on the card is simple. 
I then designed a simple Big Ben diecut to go go with it. 
If you use SVG files, you can get it HERE free for a limited time.
TIP:  By using these simpler elements, I could use a busier background paper
and not have the elements fighting each other for dominance.
Here's how to make the card:
1.  Cut a 5.5" x 5.5" piece of patterned paper and attach to 5.5" x 11" white cardstock that has been folded in half.
2.  Cut a 5" x 2.5" piece of red striped paper and attach to the patterned paper.
3.  Cut the Big Ben SVG file from black & white cardstock and attach to the card face as shown.
4.  Stamp the wreath & bulldog with black ink onto white cardstock and fussy cut out.  Attach the bulldog to the diecut as shown.
5.  Using the Distress Inks and a waterpen, color in the wreath.  Once dry, attach to the diecut as shown.
6.  Using Photoshop, create the sentiment and print on a 1.5" x 4.75" strip of cardstock.  Stamp the holly and pawprint on the strip as shown. Attach the strip to the card face.
7.  Using Distress Inks and waterpen, color in the holly.
8.  Add stickles to the wreath and holly berries as shown.

Supplies:
Cardstock: white and black
Patterned Paper: The Paper Studio "Stitched Holly", striped red from stash
Stamps:  Fiskars Clear "Christmas" & "Simple Thoughts-Dog", Print Works Collection "Bull Durham"
Inks:  Archival "Jet Black"; Distress Inks "Forest Moss" & "Bundled Sage"
Die cuts: Big Ben SVG file by The Creative Pointe
Stickles: "XMas Red"
Adhesive: ATG, glue stick
Electronic cutter: Cricut and SCAL software
Misc:  Water pen, PhotoShop, "Olde English" font, printer

DON'T FORGET TO ENTER
THE CREATIVE CHALLENGE

Wednesday, November 16, 2011

Join In On The Creative Challenge!


It's time for the second
Since January, I have given away almost 90 free SVG files on this blog. 
I also have over 50 files/sets available for sale at Cut and Create
Plus I've offered three digital stamps as well as a print and cut file. 
So now I want to see what you've created using my files! 

The Challenge rules are simple:
1.  Post any project you have created using any of my files.
Project does not have to be new, you may back link.
2.  Challenge runs until November 20th at midnight EST.
3.  Anyone can link their project, but to win a prize, you MUST be a follower.

PRIZES:
Winner of the above prize pack will be chosen randomly. 
The pack includes:
*Making Memories Mistletoe Garland Kit
*Inkadinkado Stamp Set "Christmas Tag Wishes"
*K & Company Chipboard  Die-Cut Shapes
Anita's Art Stamps Outline Stickers "Christmas Characters"

Three other randomly drawn entries will receive their choice of three of my SVG files on Cut and Create.

Plus a Special Prize(s)...
I will select at least one project for my "Creative Genius Award".
That person(s) will receive a domino ornament handmade by me and offered a Guest Designer position. 
I will also have a special blog badge for them.

Sound like fun?  I hope so!  Can't wait to see what you've all been (or will be) up to!!

Tuesday, November 15, 2011

Domino Ornament Back

I was playing in the studio yesterday finishing up some other DOMINO ORNAMENTS and had a little brain storm on how to finish the back.  I had used my Copper Mixative AI to do previous ornament backs but with this particular ornament, I wanted the back to be completely silver,  even covering up the multicolored domino dots. 
The lightbulb went off!  Remember the aluminum duct tape I've used on other projects? Well, I thought it might work great to cover the back, and it does!
Just cut the tape tape to fit the back (and run through embossing folder if desired).
It sticks to the back great and you could color it with alcohol inks to match the front if desired.

Don't forget to check in tomorrow for the "Creative Challenge" announcement!

Monday, November 14, 2011

SVG: Candy Cane

Back home after a fabulous weekend of shopping, dining and some serious fun with my Mom and sisters.  We spent time over in the Port Huron/Lexington area of Michigan.  We visited some wonderful shops in Lexington and enjoyed the the huge selection of crafty goodness at the Mary Maxim outlet in Port Huron.  On the way back "up north" we had 45 minutes to shop the "Scrapbook & Stamping Show" in Birch Run.  Was able to get a few bargains and goodies.  Now to get my housework done so I can have a few hours of "play time" before I go back to the real job tomorrow!
Get the file HERE.
Be sure to check in Wednesday for details on the Blog's
"Creative Challenge"!
There will be prizes!!

Thursday, November 10, 2011

Project: Domino Ornament

As promised, I have all the details on a similar ornament to the one I posted Sunday. 
They are really easy to do and I think they would make great gifts.
The supply list is at the bottom of the post.
Directions:
1.  Using Tonic (or similar) scissors, cut the metal mesh into a rectangle that fits the amount of dominoes you will be using.  You will want a small edge extending from the dominoes.  For my ornament, I cut the piece to be 1 3/8" x 3 1/8".  You'll notice that I cut it so that the notched portion of the mesh design is all around the edges.
2.  Next cut out portions to create any holes for hanging.  In this ornament, I cut and left two holes at the top for the hanger and one centered hole at the bottom to be able to create a dangle.
3.  Apply Glossy Accents to the sides (that will be touching other dominoes) and backs of each tile. Firmly press onto the mesh and make sure all the tiles are evenly placed.  Use a craft mat or other non-stick surface when gluing the dominoes down.  That way you can leave them on the mat to dry and there is no chance of bumping the tiles out of alignment.  Once they are dry, if they don't seem firmly attached to the metal, you can turn them over and add more GA as needed. 
 
4.  Next choose the colors of alcohol inks you want to use.  I used Meadow, Latte and Copper Mixative on my ornament.  I think having three colors makes an attractive background. 
  
5.  I used a blending tool with a felt pad and added drops of all the colors then pounced the tool over the dominoes until I got a background I was happy with.  Be sure to also color the sides of the dominoes.  Use blending solution to soften the colors if you prefer.  I like to wear disposable gloves when doing this step to keep my hands clean.
 6.  Next choose the image you want to put on the ornament.  Remember, if you don't have small stamps you can use just a portion of a larger stamp.  The secret to getting a good sharp image on dominoes is to use tissue paper.  Cut a piece of white tissue paper slightly smaller than your ornament.  Then using Archival Ink, stamp onto the tissue paper.  Trim as close as possible to the image.
7.  Turn the stamped tissue paper image over and apply Glossy Accents to the back with your finger tip.  Then very carefully place the paper onto the domino and smooth out gently with more GA.  (Tip:  I used a Q-Tip and some blending solution to take away some of the background color where Santa's face was going to be).  I stamped the sentiment and applied it to the ornament in the same way.  Let the ornament dry completely.

8.  Choose beads for your ornament.  I used two colors:  iridescent green and copper, both round and bugle beads.  I also selected a light green bauble for the dangle.

 9.  Run a generous bead of Glossy Accents along the edges of the mesh up onto the tile. 

10. Press beads into the GA.  Use a craft knife or tweezers to help nudge beads in place.  Work in a small area at a time so that the GA doesn't dry before you place the beads.  Once all the beads are placed, set on craft mat to dry.

11.  Add the top sealer coat with Glossy Accents.  Apply with even pressure all over the tiles.  Don't worry if some of the GA runs down onto the beads.  Use a pin to pop any bubbles.  This needs to dry for a day.  You do not want to handle the ornament if the top coat is at all tacky.

12.  To make the hanger, cut a 9 inch length of copper wire.  Attach to one of the hanging holes you've created and string the beads.  Then attach the other end to the remaining hole by twisting the wire and clipping off the extra wire.
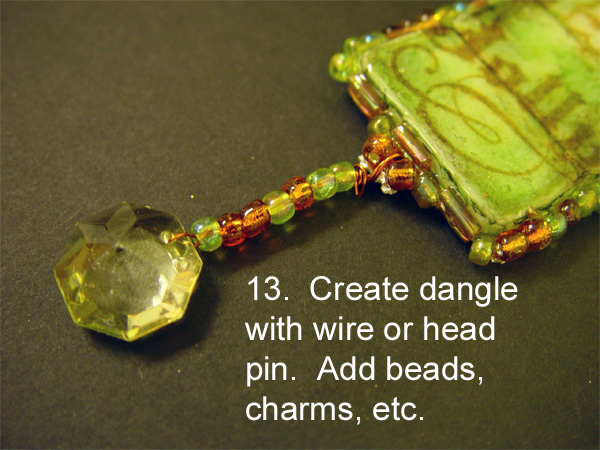
13.  As I didn't have any head pins that had a loop to attach the dangle, I simply cut a 6 inch piece of copper wire and bent it in half.  I slid the dangle into the fold and twisted.  Then added the beads onto the double folded wire.  I looped the top of the wire through the ornament hole, twisted and clipped.
 14.  I did finish the back as I wanted a copper, not silver, color on the back.  I just pounced on more Copper Mixative alcohol ink.  You could also use Glossy Accents to glue some of the same beads you used around the edges into the holes in the mesh.  That would add extra "bling" to the back and would cover up any trace of the dominoes.

**EDIT**
Click HERE to see another way to finish the back.

Supply List:
*Mini dominoes (I got mine from the Dollar Store)
*Metal radiator screen (available at home improvement stores)
**EDIT** Vicki Romaine has cut backs for sale. 
Please email here at vickiromaine@yahoo.com for details
*Alcohol inks--Latte, Meadow, Copper Mixative
*Alcohol Blending Solution
*Stamps--"Vintage Christmas" by Crafty Secrets and "Winter Silhouettes" by Inkadinkado
*Archival Ink-Coffee
*Glossy Accents
*Beads and baubles
*Copper wire
*Misc--Tonic Scissors, Blending Tool with felt pad, disposable gloves, white tissue paper, craft mat, craft knife, tweezers

Tuesday, November 8, 2011

A Sweet Christmas Card

 I'm the November 9th designer on the Card A Day Blog.  (Have you checked it out yet?  Lots of inspiration for card makers over there!) and the theme is "Christmas Food".  To me the best food at Christmas is the candy!  Yummmmmm!!!  So I put together a sweet SVG set featuring all the great Christmas candy we love:
If your electronic cutter can use SVG files,
you can purchase a similar set HERE

This is a very easy card to make...
1.  First I cut the candy using red, green, white and brown scraps.
2.  I glued the die cut pieces together and then attached each piece to red cardstock ( 2.25" x 5.5") .
3.  I added Stickles to the candy to give them some sparkle
4.  I cut a piece of (6.75" x 5.75") white cardstock and to that adhered the striped paper (6.75" x 5.25").
5.  Using computer software I created and printed the sentiment on white cardstock.  I then cut each word out and matted with red and green cardstock. 
6.   I attached the white and red dotted ribbon to the edge of the striped paper with tape.
7.  I attached the red candy strip to the striped paper.  At the same time I adhered the sentiment strips, hiding the left side of each sentiment under the red paper.
8.  Because the front of the card was larger than normal, I cut another piece of white cardstock (6.75" x 6.5") and scored the paper .75" from the top to create a flap.  I then attached that flap to the top back of the card base with tape. 
TIP:  This is an easy way to make cards that aren't the usual A2 size and not cut into your larger 12" x 12" papers.  You could also use this technique to make any type of shaped cards without worrying to get the fold just right.
Supplies:
Cardstock: white plus red, green, and brown scraps
Patterned Paper: from stash
Die cuts: Christmas Candy SVG file by The Creative Pointe
Stickles:  Distress  "Rock Candy" and "Vintage Photo"
Adhesive: ATG, glue stick
Ribbon:  from stash
Electronic cutter: Cricut and SCAL software
Misc:  PhotoShop, "Curlz" font, printer

I'm entering this card into the following Challenges:
Cupcake Craftroom--November Sweet
Crafty Hazelnut Christmas Challenge--#45
Moving Along With The Times--#123 Food and Drink

Sunday, November 6, 2011

Domino Ornament

Wow!!  Two posts in one day! 
That's because I'm getting into the Gingersnap Challenge just in a nick of time!
The theme of the Challenge is "Alcohol Inks".
I love using AIs on dominos and have made a few pendants from them.  Then I found small dominos at the dollar store and decided they would be perfect for ornaments.  I've been working on this ornament (and a few others) for the past week. 
I will have a complete project tutorial for a similar ornament soon. 
But for now, just the basic AI info:
I used Meadow, Latte and Copper Mixative Alcohol Inks
as the background on the dominoes.


SVG: Pilgrim Hat

Happy Sunday everyone!
Hope you are having a wonderful crafty day.
Are you ready for a Thanksgiving file?
EDIT:
Sorry this file is no longer free.  You can purchase it as part of a set

Don't forget the other Thanksgiving files I have available at the store: