Tuesday, November 26, 2013

Poinsettia Thank You Card

As today's featured Designer over at Card A Day Blog, I'm continuing with the "Christmas Thank You" theme with this quick and easy thank you card.  This went together very fast and once again, I was able to use up scrap papers (striped base, red & white cardstock).
I also got to play with some never before used items...some from my stash:  fabric tape (Maya Road) and poinsettia stickers (Sandylion).  And some brand new:  Sizzix Alterations Die (Tag & Bookmarks) and oval punch (Stampin' Up). 
I really love the bookplate die...it works perfectly with the sentiment stamp (Stampin' Up) and I simply placed the poinsettias over the holes.  I'm sure I'll be using this for sentiments frequently.
Entered into the following Challenges:
PAPER PLAYTIME--ANYTHING
JINGLE BELLES--THANK YOU

Wednesday, November 20, 2013

Happy Birthday Mom! (and a free SVG)

Today I'm showing off the card I recently made and sent to my mom for her birthday today!  My mom has been on the internet now for almost a year (so proud of her) so I'm hoping she'll see this post and my "Happy Birthday" wishes!!  Now here are the details on this card:
  • I used this Pinterest card as my inspiration:
  • I pulled out my embossing folders and went to work.  Then I used a square punch...which seemed dull.  So decided to sharpen it with foil...hmmm...maybe I'd try embossing and punching out squares from aluminum tape.  So I did that and punched out a pile of squares.
  • I stuck the squares to the craft mat and pounced on alcohol inks (Cranberry & Silver Mixative)
  • Next I applied the squares to the base paper (Around The Block "Filigree")
  • The edges didn't look neat enough, so I used a ruler to add black Sharpie lines.
  • Punched the border (Martha Stewart) and cut the cupcake (SVG file) from black cardstock.  Embossed the "frosting" and used the score board to create the "wrapper".  Black foam dots gave the cupcake dimension.


  • Tied on a gray ribbon.  Stamped and punched the sentiment (Stampin' Up) and attached.
I've made a few more cards following the same inspiration that I'll share later.  
In the meantime, here's a picture of me and Mom at a family wedding in June.  She's 74 and busier than women half her age.  She is a fantastic quilter and sewer and lately has gotten into making beautiful papercrafts and scrapbooking.  I hope I look as gorgeous as she does when I'm her age!

And now, here's a present for all you electronic cutters!  
Get the Birthday Cupcake SVG file FREE for one week only.  
Grab the file HERE free until 11/27/13.

Tuesday, November 19, 2013

More Charger Plates

In yesterday's post, I showed you the first of the three chargers I created as my DT project for Creative Cutting Challenge.  Well, I had a four pack of chargers so I had to create three more!  And here they are.
 
These will be given as gifts and donated for an upcoming charity auction.  
So very fun to make...I'll be on the look out for discounted ones after Christmas...so I can make more!  If you'd like to make your own, you can purchase the SVG cut files for all of these chargers at my online STORE (along with over 150 other files).  
Entered Into the Following Challenges:
USE IT TUESDAY--STICK IT (Bought the chargers on clearance two Christmases ago!)

Monday, November 18, 2013

Reindeer Charger Plate


I've been seeing lots of beautiful charger plates created using vinyl over at one of the SCAL  FB groups I belong to.  So for my "Christmas--Not A Card" Design Team project, I decided to create my own.  
The charger above is one of four charger SVG designs newly available over at my Cut and Create SHOP.  These files are sized to fit a standard 13" charger plate.  Just cut from outdoor (Oracle 651) vinyl and apply. 
Here's how I cut and applied the vinyl to the charger:
First I arranged each word of the design on the mat to conserve as much vinyl as possible.  I don't recommend breaking elements down any further...you want to keep the curve and spacing of each letter. I cut the vinyl using a higher than normal blade and pressure.  Then I weeded and cut out each word, leaving the vinyl attached to the backing paper.
Next I arranged the words on the charger, placing them where they would eventually be attached.
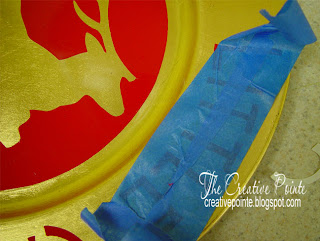
For the words on this charger I used painters tape as my transfer tape.  I made sure to "unstick" it by pressing it on my clothes a few times.  Place the tape over the top of your letters and lightly press down.  For the larger design, a larger square of "unstuck" clear contact paper works great.
Then I turned the taped letters over and peeled off the backing paper.  
I pressed the taped letters on the plate in position and carefully pulled off the painters tape.
Finally I carefully burnished the letters to make sure that they were stuck fast.
As I attached each word, I double checked to make sure that the spacing was similar.  I'm not so precise that I used a ruler, just eyeballed it.
Here's another look at the charger.  This can be displayed on a shelf for the season, in an easel or use a clear glass plate over it for serving holiday goodies.  Hope you liked the project!  Don't forget to check out all the great Design Team Christmas inspiration over at CREATIVE CUTTING CHALLENGE.  If you are an electronic cutter who uses SVG or similar files, I hope you'll join in the challenge....we want to see your creations and you just might become a winner!
Entered Into the Following Challenges:
CRAFT MY LIFE/ALL CRAFTS--OCTOBER/NOVEMBER
SPEEDY FOX & FRIENDS--RED CHRISTMAS
COME AND GET IT--CHRISTMAS GIFT
ALL SORTS--MAKE A GIFT
HIDING IN MY CRAFT ROOM--DIE CUTS
USE IT TUESDAY--STICK IT (Bought the chargers on clearance two Christmases ago!)

Friday, November 15, 2013

Part Two: LWD Design Team Showcase: Altered Altoid Tins & Distress Markers on Vellum

I hope you saw yesterday's POST as I gave the directions to make your own altered tin ornaments.  I also gave all the embellishment details on two (top and left) of these ornaments.  Today I'm going to give you the details on the other two.

First up, here's a look at a tin top that I turned into this angel ornament.  

Here are the details:
  • Before I adhered the paper (Tim Holtz Seasonal Stash) to the tin, I used Victorian Gold Vintaj Patina and a paint brush to change the silver edge of the tin to gold.  I then added the paper as detailed in yesterday's post.
  • I created the angel by stamping (Rubber Stampede Angel Chorus Collage) the design on vellum using Jet Black Archival ink.

  • I turned the vellum over and used Distress Markers to color the angel on the back side of the stamping.  I love how the markers look through the vellum!  Then I cut her out, leaving the bottom and right side straight with a small edge of vellum below the design.
  • Next I folded that edge, giving me a spot to attach the vellum to the tin using Glossy Accents.  This will "pop" the angel up from the back of the ornament, giving it some nice dimension.
  • I used foam dots here and there to keep the angel popped up.
  • Punched holes and beaded a wire for hanging.
  • The vintage gold braid was added with a hot glue gun.
  • The banner was diecut and embossed using a Spellbinder's banner die.  The sentiment (Hero Arts "Holiday Sayings") was stamped with Distress Embossing Ink and then embossed with gold embossing powder.  I Used a gold metallic Sharpie marker to accent the banner then swiped a little Walnut Stain Distress Ink around the edges.  I attached it to the tin with hot glue.
Finally, a look at the last "shadow box" ornament.  
  • I used the new Tim Holtz "Merriment" paper stash on the entire ornament.
  • The Santa was a mini ornament (hanger removed).  He was placed on a wood block bead (both glued in with Glossy Accents) and then Snow Writer snow and a piece of greenery were added.
  • The little wreath and the vintage silver braid were both hot glued to the tin.
  • Holes were punched for the beaded hanger and dangle.  I used Silver Patina to change the brass jingle bell to silver.

Well, that's it!  I hope you enjoyed the "how-to's" on these altered tin ornaments!  If you make some of your own, I'd love to see them...so please share!!  You can find most of  the products I used below plus many more for your crafting projects at 25% Off MSRP at Lone Wolf Designs, LLC.  All you have to do is join the LWD Discount Retail Sales Facebook group.  If you haven't joined us yet, you're paying too much for your craft supplies!

Supply List 
(LWD Product Performers SKUs in red):
Altoid tin
Needle nose pliers
Scrap cardstock/pencil/scissors  (to make templates & banner)
Vellum
Ruler
Various embellishments, greenery, braids, wood block bead, jingle bell, etc.
Beads
Wire
Hot glue gun
Foam dots
Paint brush
DecoArt Snow Writer
Twinklets Diamond Dust
Sharpie marker-gold
Gold embossing powder
Silver headpin, jumprings
Ranger - Non-stick Craft Sheet LARGE --SKU #RINSC20677

Tonic - Tim Holtz Non- Stick Micro Serrated Scissors--SKU #TO817

Advantus - Tim Holtz - Ideaology - Paper Stash - Merriment--SKU #AVTH93100

Advantus - Tim Holtz - Ideaology - Seasonal Paper Stash--SKU #AVTH92866

Ranger - Claudine Hellmuth Studio Multi Medium Studio Multi Medium Matte--SKU #CHHSP24927

The BeadSmith - Vintaj Metal Hole Punch--SKU #BSVPLHP15SH

Ranger - Glossy Accents Ranger - Glossy Accents--SKU #DPGAC17042

Ranger - Vintaj Patinas - Open Stock - Victorian Gold--SKU #DPVPI35626

Ranger - Vintaj Patinas - Open Stock - Nouveau Silver--SKU #DPVPI35619

Ranger - Archival Ink Pads - Jet Black--SKU #DPAIP31468

Ranger - Tim Holtz - Distress Markers Set - 49 Markers--SKU #THTDMK39082

Spellbinders - Shapeabilities Ribbon Banners--SKU #SRS4324

Ranger - Distress Embossing Ink and Refill Ranger - Distress Embossing Ink--SKU #THTIM21643

Ranger - Distress Pads by Tim Holtz Ranger - Distress Ink - Walnut Stain--SKU #THTIM19534


Entered Into the Following Challenges:


Thursday, November 14, 2013

LWD Design Team Showcase: Ranger/Claudine Hellmuth Studio Multi Medium Matte & Tim Holtz Paper Stash--Merriment & Seasonal

Time again for another Lone Wolf Designs Design Team Showcase!  Today I'm sharing these ornaments...made from altered Altoids tins.  These are lots of fun to make and really easy too, when you have a simple template and the right medium!  
Here are the simple steps:
  • First you'll need to separate the top of the tin from the bottom, giving you bases for two ornaments.  (I like to use the bottom half for a "shadow box" style ornament.)  Use a pair of needle nose pliers and gently pull back the little hinges that are on the bottom half of the tin.  Then, use a pair of Tonic scissors to nip off the hinge tab.  If there is any piece of the tab sticking up, just press it down with the pliers.  This doesn't have to be too neat as paper will cover the holes.
  • Next choose your papers.  You'll need to cover all sides of the tin piece. I chose the two Christmas paper stashes from Tim Holtz.  The "block" and "strip" patterns on the pages of these pads work perfectly for this project.
  • I find it easy to make multiples of these ornaments by creating a cardstock template for the insides and outsides of the tin pieces.  Then I simply lay it on the portion of the paper I want to use and cut around the template.  For the sides, I just use a ruler to measure what the depth of each strip should be.  A full 12" length is perfect to go all around the tin.  Cut all the pieces before gluing them to the tin.
Using my finger, I swipe a good coat of Studio Multi Medium around the inside rim of the ornament and then gently press the paper strip all around.  Another swipe of Medium goes on the overlapping edge of the paper. Then I swipe Medium on the back of the background paper and press into the ornament.  The beauty of Studio Multi Medium Matte is that you can be as sloppy as you want...it dries clear and it holds the paper to the tin beautifully!
  • Apply the paper strip to the outside edge.  I like to cut that strip slightly deeper so that I can make little snips and fold the edges over the back side.  That way if my back piece isn't quite perfectly cut, my tin is still covered.  Then apply the back piece by swiping Medium on the back side of your paper and pressing it to the tin.  The Medium also dries very quick so you can keep on going!
  • Now it's time to decorate your ornament.  A little planning here.  Experiment with little figurines, greenery, tinsel, beads, etc to see what looks best before attaching them. Decide how you want to have your ornament hang and whether or not you want to add a "dangle" to the bottom.  I use my Vintaj Hole Punch Pliers to add the holes in the tin for hanging.
So lets take a closer look at two of the ornaments and I'll detail the embellishments.
  • I used the Seasonal Stash Paper on the inside and the Merriment paper on the outside.  
  • The little snowman was a mini ornament (removed the hanger) and he is attached to the tin with Glossy Accents.  
  • The "snow" around him was created using a DecoArt Snow Writer.  I have lots of "snow" mediums but I like the Snow Writer for this project because I can easily put the snow right where I want it.  While this was still wet, I added a few pinches of chunky glitter. 

  • The "snowflakes" on the background are plastic beads accented with gems.  These were attached with hot glue.
  • I also added some Picket Fence Distress Stickles accents here and there.
  • A vintage silver pipe cleaner was added along the edge with hot glue.
  • Beaded wire hanger and beaded dangle accented with an acrylic snowflake.

  • This ornament was created from the top of  the tin.  I used the Tim Holtz Merriment Paper Stash.
  • I punched holes at the top and used baker's twine as the hanger.  
  • I punched holes in the sides and wired the Word Band to the tin.
  • Vintage silver trim added around the edge with a hot glue gun.
  • The greenery, berries, pine cones and vintage trim bow were added with hot glue.
Stop back tomorrow and I'll have more to share on making these ornaments!

I hoped you enjoyed this Multi Medium and Paper Showcase!  You can find most of  the products I used below plus many more for your crafting projects at 25% Off MSRP at Lone Wolf Designs, LLC.  All you have to do is join the LWD Discount Retail Sales Facebook group.  If you haven't joined us yet, you're paying too much for your craft supplies!

Supply List 
(LWD Product Performers SKUs in red):
Altoid tin
Needle nose pliers
Scrap cardstock/pencil/scissors  (to make templates)
Ruler
Various embellishments, greenery, braids, etc.
Beads
Wire
Silver headpin, jump rings
Hot glue gun
DecoArt Snow Writer
Twinklets Diamond Dust
Ranger - Non-stick Craft Sheet LARGE --SKU #RINSC20677

Tonic - Tim Holtz Non- Stick Micro Serrated Scissors--SKU #TO817

Advantus - Tim Holtz - Ideaology - Paper Stash - Merriment--SKU #AVTH93100

Advantus - Tim Holtz - Ideaology - Seasonal Paper Stash--SKU #AVTH92866

Ranger - Claudine Hellmuth Studio Multi Medium Studio Multi Medium Matte--SKU #CHHSP24927

The BeadSmith - Vintaj Metal Hole Punch--SKU #BSVPLHP15SH

Ranger - Glossy Accents Ranger - Glossy Accents--SKU #DPGAC17042

Ranger - Designer Series Stickles Glitter Glue Ranger - Distress Stickles Picket Fence--SKU #THTDS26488

American Crafts - Bakers Twine Value Pack - 24 Spools--SKU #AC89423

Advantus - Tim Holtz - Ideaology - Word Bands - Christmas--SKU #AVTH93085


Entered Into The Following Challenges:

Monday, November 4, 2013

Textured Thanksgiving Card

 The newest Challenge over at CREATIVE CUTTING CHALLENGE is "Thanksgiving".  I wanted my DT piece to have a ''crispy, leafy look".  Does that make sense?  All I know is that living in the woods in northern Michigan, I have a LOT of colored, dried leaves on the ground and I love their texture and how they get crinkly and delicate.  I tried to reproducer this feeling in my Thanksgiving card.  Here's how I created it:
  1. I used kraft cardstock as the base.  Using a mesh background stamp (Unity Stamp Co.), I stamped all over the front of the card using Vintage Photo Distress Ink.  I blended Walnut Stain DI around the edges.
  2. I cut the designer paper (Reminisce "Autumn Harvest") using a file from Arty Accents.  I sized it to fill the front of the card and once cut, I blended Walnut Stain DI all around the edges.  I attached it to the card front with a glue stick.
  3. I cut three leaves from kraft cardstock using the maple leaf file from the Fall Leaves set.  Each leaf was embossed with a different embossing folder and then colored with Distress Inks (Forest Moss & Shabby Shutters, Aged Mahogany & Tattered Rose, Rusty Hinge & Dried Marigold).  Then each leaf had Distress Photo and Walnut Stain DI blended around the edges.
  4. Using a ruler and stylus, I added veins to the leaves so that I had a place to bend and shape them.  The two bottom leaves were attached to the card using a tape gun down the middle.  The rest of the leaf was attached with a glue dot after I bent and shaped the ends.  (It's hard to show this in the photo)  The top card was attached with foam tape to lift it up from the other two.  A jute ribbon was added with a glue dot.
  5. I stamped the sentiment with Archival Ink (Sepia) on a scrap piece of kraft.  The faux stitching was added with a brown LePen.  I cut the edge to make a banner and then attached it with foam tape.
  6. I also used the same Distress Ink colors to stamp a border of leaves along the kraft envelope flap.
Here's another look.  Hope you will join us and check out all the great Design Team Thanksgiving inspiration over at CREATIVE CUTTING CHALLENGE.  If you are an electronic cutter who uses SVG or similar files, I hope you'll join in the challenge....we want to see your creations and you just might become a winner!
Entered into the following Challenges:
OPUS GLUEI--#169 THANKS VERY MUCH
HIDING IN MY CRAFT ROOM--FALL COLORS
MARK'S FINEST PAPERS--ORANGE & BROWN
CARD MAKIN MAMAS--#76 THANKFUL TIDINGS
CRAFTITUDE--#52 USE TWINE OR STRING
CRAFTY HANDS--ANYTHING GOES
CUT IT UP--THANKSGIVING
FRILLY AND FUNKIE--THANKSGIVING
SIMON SAYS STAMP WED--ANYTHING GOES
CUTTLEBUG MANIA--AUTUMN
DIE CUTTING DIVAS--#139 ANYTHING GOES
JUST INSPIRATIONAL--AUTUMN FALL COLOURS