Friday, December 27, 2013

LWD Design Team Showcase: Lawn Fawn Bannerific and Sophie's Sentiments Stamps


Well, Christmas has come and gone for another year.  I hope you had a wonderful day spent with loved ones.  Today's Lone Wolf Designs Design Team post features projects geared to the next two holidays--New Year's and Valentine's Day--created with an easy masking technique using clear stamps from Lawn Fawn.
Here are the stamp sets I'm using--Bannerific and Sophie's Sentiments.  These are the first Lawn Fawn stamps I've purchased and I can definitely recommend them.  They are nice and thick, adhere well to an acrylic block and make a nice clear image.  I did notice that the banner outlines are not that high, so when inking you don't want to press too hard, otherwise you'll get unwanted ink inside the outline.  Other than that, they are a versatile addition to my clear stamp collection (of which my storage system for them is shown below).   
Now, on to the projects!  I'm going to demo a very easy masking technique, perfect for the banners in the featured stamp set.  

To create the masks:
To make the masks used in both projects, you'll need clear acetate (an idea--reuse clear plastic packaging) and StazOn ink.  StazOn will adhere to the acetate and not come off when coloring around the mask.
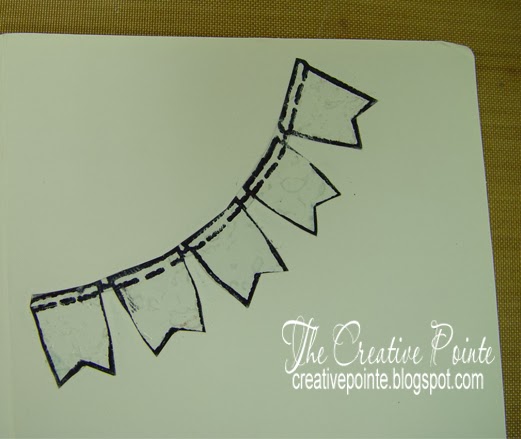
Stamp your image on the acetate, wait for it to dry and then cut out on the stamped lines. 
After stamping my straight banner mask, I wanted to make one that curves.  The easiest way to do that is (gasp!) cut your stamps!  Now, don't worry, it won't hurt them.  I just used my Tonic scissors to cut little slits along the bottom...not too far, just enough to allow the stamp to curve. 
Once I had the curve I liked, I stamped it on acetate and cut out...just like I did with the straight banner. 
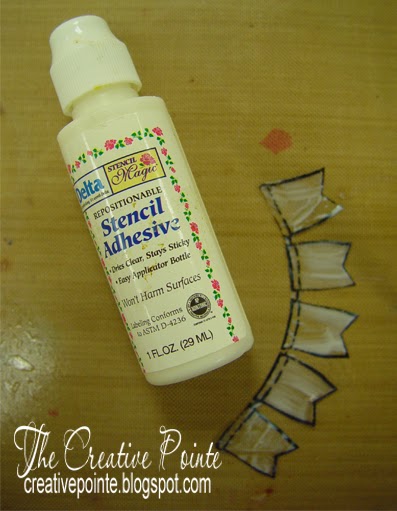
For "tear free" masking, you must use a stencil adhesive.  This allows the mask to adhere to (and release from) your paper.  Just swipe it on the back of the mask using your finger...it dries fast, but make sure it's good and dry before proceeding.

To make the card:
Using white cardstock, place your mask on your paper and press firmly down.
 
Add color to the front of the card, right over your mask.  Distress Ink and an ink blender tool work perfectly.  I used Broken China and applied the ink heavily around the mask. 
Once you have the color to your liking, pull up the mask...and see the banner!  If you have some areas that aren't dark enough for you, replace the mask and blend more ink onto your card.
Next, stamp over the masked area.  I used Faded Jeans Distress Ink.  Don't worry if it's not perfect. If you have any white areas outside the stamped outline (like I did to the right), just take your blending tool and rub more ink on.   I used Faded Jeans DI to stamp the sentiment in the banner and then embossed the card front.
Bring out the embossing with a darker ink lightly swiped over the raised areas.  
To finish the card, add embellishments and finish the sentiment.  The sentiment was stamped using Faded Jeans DI on white cardstock, trimmed and attached to card.  I stamped the clock face and wings using silver ink on white cardstock.  I slightly bent the wing tips for dimension and swiped Faded Jeans DI around the clock face.  Each piece was added to the card with pop dots.  
You can use the "Let's Celebrate" sentiment inside for a New Year's card or "Happy Birthday" for a card to use year round.  For this card, I used both as New Year's Eve is hubby's birthday!
Here's another look....

To make the tag:
Cut or cover a tag with designer paper.  
Do your recognize the paper I chose?  It's from the Tim Holtz "Merriment" Stash, the same paper I used in my last Christmas DT project.  This paper does double duty!  I used a die to cut the tag and then punched a border along the bottom. 
There are a few extra steps to masking on designer paper.  For a placement pattern, stamp your design first, then add Picket Fence Distress Stain over the stamped area.  This will take a few coats.
I used Barn Door DI as it blended in with my paper...just dark enough to see where to put the DS. 
Once the Stain has dried, place your mask on the paper and press it down well.  To cover the designer paper better, I used Distress Stain.  Note:  no matter how well you press down, there will be some leakage under the mask.  Don't worry!  It's an easy fix.  Press out some Picket Fence DS onto your craft mat and with a small brush, pick up the stain and "paint" it over any stray colored stain. 
Using Archival Ink, stamp on the design.  I used Jet Black.  You can stop here or go on with more details around your stamped area.
 
Here I used Vintage Photo Distress Ink and blended it on top of the banner to tone down the white a bit.  I also used a Vintage Photo Distress Marker around parts of the banner to add depth.  I stamped the sentiment using Archival Jet Black Ink. 
Decorate your tag.  I used flat lace, round doily, wooden heart (colored with Barn Red DS), heart button, diecut flourish (bedazzled with Stickles), frozen Charlotte doll (decked out with paper crown and sash), little "14" card (cut from the same paper stash) and a black metal key (adorned with a red gem)  Ribbons were added to the top hole.
Here's another look:
 
I hoped you enjoyed this Lawn Fawn Stamp and Masking Technique Showcase!  You can find most of  the products I used below plus many more for your crafting projects at 25% Off MSRP at Lone Wolf Designs, LLC.  All you have to do is join the LWD Discount Retail Sales Facebook group.  If you haven't joined us yet, you're paying too much for your craft supplies!

Supply List 
(LWD Product Performers SKUs in red):

Lawn Fawn - Bannerific Stamp Set--SKU #LF339

Lawn Fawn - Sophies Sentiments Stamp Set--SKU #LF318

Tsukineko - StazOn Pad - Jet Black--SKU #TSSZ031

Tsukineko - Encore Pads Metallic Silver--SKU #TSUM012

Ranger - Archival Ink Pads - Jet Black -- SKU #DPAIP31468

Ranger - Distress Pads by Tim Holtz - Broken China--SKU #THTIM21414

Ranger - Distress Pads by Tim Holtz - Faded Jeans--SKU #THTIM21452

Ranger - Distress Pads by Tim Holtz - Barn Door--SKU#THTIM27096


Ranger - Distress Pads by Tim Holtz - Vintage Photo--SKU #THTIM19527

Ranger - Tim Holtz - Distress Stains Picket Fence--SKU #THTDW31246

Ranger - Tim Holtz - Distress Stains Fired Brick--SKU #THTDW29854

Ranger - Tim Holtz - Distress Marker Vintage Photo-- SKU #THTDM32731

Sizzix - Tim Holtz Alterations - Texture Trades Embossing Folders 2pk. - Steampunk Set--SKU #SXTH657195

Ranger - Non-stick Craft Sheet LARGE --SKU #RINSC20677

Tonic - Tim Holtz Non- Stick Micro Serrated Scissors--SKU #TO817

Ranger - InkBlending Tool Handle and Replacement Foam Ranger - Ink Blending Tool--SKU #RIIBT23616

Advantus - Tim Holtz - Ideaology - Paper Stash - Merriment--SKU #AVTH93100
Stampers Anonymous-Tim Holtz Cling Mounted Stamps-Mini Classics-- SKU #STCMS062

Sizzix - Tim Holtz Alterations - Tag Bookplate Die--SKU #SXTH656938

Acetate or transparency piece
Acrylic Stamp Block

Delta Stencil Adhesive
White cardstock
Stamp Set--Hampton Arts "Time Pieces"
Stamp Set--Hot Off The Press "Flights of Fancy"
Stamp Set--Martha Steward Alphabet
Border Punch--Martha Stewart
Small paint brush
Foam dots
Various embellishments & ribbons

Wednesday, December 25, 2013

Monday, December 23, 2013

Christmas and New Years Scrapbook Layouts

The last Christmas themed post until next year!  These are two more projects using the new Tim Holtz "Merriment" paper stash.  I love the vintage "chalkboard" style heading.  (Remember when I also used it in miniature on this ornament?  Love all the sizes in Tim's stash.)
(By the way, this ornament went to a good home and the proceeds from it's sale went to a great cause!)
This sheet of paper was perfect to use for photos from our day of sledding.  I cut my photos so that some of the paper's images were also featured.  The heading was created from stickers and an electronic cutting file.  Looks like the "big kids" had the most fun that day!

Sunday, December 22, 2013

Painted Christmas Tableware

Just a quick post as I am trying to get in the last of the Christmas projects to show you before it's all over!  These are glasses, napkin rings and plates I recently painted for a charity auction.  I use Folk Art Enamels to paint my glass.  With this paint you have the option to let it air dry for 21 days or bake for immediate use.  Who ever won these will have a beautifully set table for the holiday season!


Friday, December 20, 2013

Clear Ornaments with Acetate Inserts

Have you tried the ornaments that look as if the element inside of them is suspended in the middle yet?  The secret is an acetate insert (more on that below).  Recently I made up a batch of them for gifts and auction items and I can share a few of them with you now.  (The others are gifts for blog readers, so you won't see those until after Christmas!)  
The ornament above was done using papers from Graphic 45.  Inside filled with faux snow and glitter.  A band of vintage glass glitter circles the flat round ornament.  The little charm was done using a Tim Holtz Fragment and adhering paper to the back side with Glossy Accents.
 
This little guy (and the snowflakes around him) were stamped onto the acetate and then colored with alcohol inks and Sharpie markers.  Snow and glitter added to the ornament.
A bulldog ornament created the same way as above.
My little bulldog prince ornament was created just like the ones above.  Instead of snow, he got a royal blue carpet of beads and a dog bone added inside!
Ready to make your own?  It's easy!  
To make it simple, I've created this SVG so you can cut them out fast!
Get the electronic cutting file (SVG) for free HERE.
If you don't have a cutter, leave a comment below for a chance to win three inserts--
cut and mailed to you to decorate and create with!

Sunday, December 15, 2013

Coordinating Christmas Cards

At a recent scrapbook event, I couldn't say no to some awesome deals on paper.  One of the deals was on double sided glossy paper by Little Yellow Bicycle (25 Days of Christmas) and packs of embellishments.  I picked out 5 coordinating sheets and a pack of stickers.  I vowed to make Christmas cards from these papers if I bought them and amazingly I kept that vow!  Even more amazing...I used every single sticker from that pack!!
The cards have been mailed out a few days now so it's safe to share them with all of you!  
Here's a closer look at the cards.
For this card, I used a border punch along the side of the designer paper and laid down a strip of sparkly white glitter tape to the left of the punch.  This was placed over white embossed cardstock.  The bulbs and sentiment are stickers.
This card has more embossing, punching and glitter tape.  The sentiment is a sticker.  I used a strip of paper and the snowflake rosette die (Tim Holtz), to create the rosette...topped off with a snowflake button.
 

No embossing, but same punching and glitter tape.  The reindeer is a sticker added to white cardstock and fussy cut.  The nose is a red gem.  The sentiment is white rub on letters punched from designer paper and matted with white cardstock. 
More snowflake embossing/glitter tape.. but the decorative edge laid over it is paper left over from the rosette die cut.  A great way to use up scraps!  The sentiment sticker was laid on white cardstock and punched out.  The poinsettias are stickers.

There were two more cards made that I'm not showing.  I still had plenty of paper left, so I made some gift card holders which I'll show you next.

Entered into the following Challenges:


Tuesday, December 10, 2013

Winter Carpool Card

As today's Designer over at Card A Day Blog, I followed the "Snow" theme by creating this fun card--perfect for one of my snowmobile enthusiast relatives!  
I used scraps for the base and accent paper.  The larger piece chosen because of the "retro" style snowflakes to go with the image.  The accent piece was cut top and bottom with deckle scissors.  
The image is a copy of a postcard (Duckboy Cards) that I printed on white and matted in black and white cardstock .  The card is embellished with silver rickrack, paper snowflakes and a large chipboard snowflake that I embossed with white embossing powder.  All the snowflakes are accented with silver Stickles dots.
Entered into the following Challenges:


Sunday, December 8, 2013

Quick & Easy Gift Bags

After creating the set of charger plates from vinyl (seen in this Post and this Post), I was left with some large "negative" pieces of vinyl.   Here's how I use those scraps...to make quick and easy gift bags!  Just go to the dollar store and pick various colored gift bags and then next time you have pieces left over from a project, add them to the bags and you'll have a stash of gift bags ready to go.
You could decorate the bags more...with stamping, washi tape, ribbon, etc....or just leave them as is.  And you may not even want to wait until you have vinyl negatives.  Use any vinyl scraps to cut or punch designs to add to the bags.  

Thursday, December 5, 2013

Frilly & Funkie Guest Designer Project

I'm thrilled and honored to be chosen as Guest Designer over at the Frilly and Funkie Challenge Blog for their "Gift Tags and Thank You Cards" challenge.  In addition to the biweekly challenges, Linda and the DT gals feature awesome tutorials and some fabulous projects.  If you're not a follower, you definitely should be!
The project I created is a gift tag that can do double duty as a Christmas ornament.  The photo below shows the decorative front and the back, which is all ready to fill out for the recipient.  I love the faux chalkboard look, so I wanted to incorporate it into my tag.  And since I love to WEAR black and red, I couldn't resist using that color combo on the tags.  Scroll down for the step-by-step instructions and try one yourself!
Project Details:
  • Stamp sentiment (Inkadinkado "Holiday Greeting") on black cardstock using white pigment ink (Stampin' Up "Whisper White").  Make sure ink is completely dry then fussy cut out as shown.
  • Using a Big Shot (or similar die cutting machine) and dies (Sizzix Tim Holtz Alterations "Tag & Bookplates" and  "Scallops"), cut a front and back tag from coordinating designer paper (Fancy Pants "Joy" and "Making Memories "Advent Mistletoe").  Cut the scalloped accent (Me & My Big Ideas "Fantastic Christmas 5") and the oval bookplate and reinforcers (black cardstock).  Punch the border (Martha Stewart) from black and the oval (Stampin' Up) from red cardstock.
  • To put the front together, attach the border to the front of the tag.  Over that add the scalloped accent paper.  You may have to hand punch through your accent paper where the hole is.  Using Distress Ink (Aged Mahogany), swipe the edges with a blending tool. Then attach ribbon and knot on a bow.  

  • Turn the tag over and glue down the back piece.  Stamp the sentiment (Sandy Lion "Christmas") with black ink (Archival Jet Black) on the red oval and then glue to the back of the bookplate.  Attach the reinforcer around the hole and the completed bookplate on the edge of the tag as shown.  Add black gems to cover the bookplate holes (not shown).
To finish off the front, attach the sentiment on the right side of the tag (so that it covers the exposed bookplate on the back) using black foam dots.  Attach the reinforcer at the hole and add the black gems as shown.  Thread ribbons and baker's twine through the hole.

Here's another look...
On this tag, I swiped a little more Distress Ink around the edges.
Entered into the following Challenges: