Friday, February 28, 2014

LWD Design Team Showcase: Spellbinders Media Mixage Bezels, Bezel Dies and Ice Resin

Welcome to another Design Team Showcase prepared for Lone Wolf Designs.  
Today I'm presenting bezels I created using Media Mixage products from Spellbinders and Ice Resin.  I'll admit, I was a bit intimidated by the thought of using Ice Resin.  It had been sitting untouched in the studio for a while as I researched techniques online.  I didn't believe that using it could be as simple as the directions on the package state.  I was pleasantly surprised about how easy Ice Resin really is to use!  And when you use the Spellbinders Media Mixage dies and bezels, it's even easier to get a beautiful result!  
So keep scrolling and I'll show you how I made my bezels. 
 The first thing I did was take the three bezel dies and create a template of the bezel openings.  I placed the template over various papers and collage sheets to find a look that pleased me.  I decided to use the two smaller bezels horizontally on bracelets...saving the larger bezel for a future horizontal pendant.
I used an oval of decorative paper (K&Company "Jubilee") for the top bezel and one of the images from the Piddix Collage Sheet (Flora & Fauna) that I had left over from my previous Showcase.  The dies cut the paper perfectly.  And I've used them for other projects, not just filling the bezels.
In the larger of the two bezels I added some words (Cosmo Cricket "Tiny Text") and a gem to the paper.  I left the smaller bezel's paper undecorated.  Next I used the Ice Resin Paper Sealer to keep the images colorfast.  Just brush on the sealer.  When you use a nonstick craft mat the job is clean and easy!  In my online research, some people have used packing tape or Mod Podge to seal their images.  I did not try these methods so I can't recommend them.  If you don't seal your image it will become transparent...not the look I wanted for these particular pieces. I gave each diecut three coats each on the top and bottom.  Once they were totally dry, I made sure that they fit back into the bezels.  I did have to trim the smaller diecut a bit as some of the sealer flowed off the edge.
Since Ice Resin forms a natural dome, you want to make sure the surface you let it set up on is level.  Luckily one of my counter tops was level.  If your surface is not level, you can use shims to make it so.
The moment of truth...mixing the Ice Resin!  For beginners, I think that the plunger product is the only way to go.  No worries about measuring the two ingredients properly.  Simply cut the tops from each tube and evenly plunge the liquids into a mixing cup.  (I guessed how much product I would need and had just enough to fill both bezels.  I did have a mold on standby just in case I mixed too much as I didn't want to waste any resin)  Using a craft stick, I gently mixed the Ice Resin for two minutes and then let it rest for five minutes.
I carefully poured and then dripped the Ice Resin into the bezels.  I got down to eye level to make sure I had enough of a dome (without spilling over).
There were a few bubbles still in the mix so I took my heat gun and gave it a quick go over...bubbles disappeared!  Now came the hard part--waiting  6 to 12 hours for the resin to fully dry!
Success...even though there were a few surprises (which I'll go over below), I was pleased with how my first attempt at resin turned out.  I was really impressed with how hard, clear and smooth the piece came out.  I attached beads to the bezel and happily wore my new bracelet to work on Monday. 
Here are my tips on using Ice Resin.  There is TONS of info and videos on the web...I spent a lot of time reviewing these and getting many more ideas....so definitely more resin pieces to come!  
Beginner Ice Resin Tips:
  • Proper mixing is SUPER important.  In a second batch, one of the syringes didn't dispense equally and the resulting pour was off a bit...making the finished piece tacky.  I found out that this problem is easily fixable by sponging on a thin coat of resin.  I figured out that the reason for the mis-measure was temperature.  It was chilly in the studio and that makes the liquid run slow.  I set the product near the heat source for about an hour and the resin flowed much better.
  • Discovered that if you do get a bubble at the surface after curing, you can sand the resin and add another coat over it.
  • Discovered that the paper floated in the resin causing one side to lift up from the bezel.  Not perfect but still looks okay.  Before pouring another piece, I used the paper sealer as a glue to hold the paper to the bezel and I had no issues with lifting.
  • Something funky happened to my gem (just diagonal from the "art" word).  After the resin cured, it looked like the gem had dissolved.  After online research, another blogger stated that she thought the resin refracted the light differently making the gem facet disappear.  Not sure about that, as it sure looks like a flat piece of silver to me (which I am fine with).
I hoped you enjoyed this Ice Resin & Spellbinders Media Mixage Showcase!  You can find most of  the products I used plus many more for your crafting projects at 25% Off MSRP at Lone Wolf Designs, LLC.  All you have to do is join the LWD Discount Retail Sales Facebook group.  If you haven't joined us yet, you're paying too much for your craft supplies!
Entered into the following Challenges:

Monday, February 17, 2014

Oh BABY banner!


This fortnight over at Creative Cutting Challenge we are celebrating all things "Baby".  
A very timely theme as I needed to start working on decorations for an upcoming baby shower.  So whose shower is it you ask?  None other than the Squirrel herself!  A big congrats to Vicki and her hubby on the coming birth of their first baby, due right around their first anniversary!  lol 
This Auntie hopes it is a girl (hence the two pink baby pins on the banner) as I only have one niece on that side!  Of course, we'll take whatever God delivers, as long as the baby is healthy.
Since the sex of the baby is staying a mystery, I used generic colors of pink, blue and yellow for the bottle and pin SVG cuts, from my Baby Set . A roll of seam binding and bits of ribbon holds it all together.
If you use an electronic cutter, I hope you'll join in the "Baby" Challenge.  Just click Here for information.
Entered into the following Challenges:

Sunday, February 16, 2014

Pet Sympathy Card & SVG Freebie

Unfortunately I needed to send out a sympathy card for a friend who just lost their dog.  I had pinned a similar card from Claudia, who used dies to create the paw print.  I figured that I would create a SVG cut file to make it easy to do multiples.
Get the card file HERE free until Monday, February 24, 2014.

This card is entered into the following Challenges:

Friday, February 14, 2014

Valentine's Week: Tag Topper Goodie Bags

Happy Valentine's Day!  
Hope you enjoyed all the Valentine's inspiration this week.  
Today we're wrapping up with a quick and easy way to make a goodie bag topper using a tag.  You can use any tag or cut your own using a die or an electronic cutter.  I'm using the standard 3 1/8" x 6 1/4" tag which I diecut from red cardstock using the Sizzix Tim Holtz Alterations "Tag & Bookplates" die.
Directions:
 Using a scoreboard, score and fold your tag as shown in photo above.
 Glue the side (closest to hole) of the mountain between the two folds and press to the top of the tag.
 Cut a square of coordinating paper for the front of the tag.  Decorate as you like and add a ribbon or cord through the tag hole.
 Fill a cellophane goodie bag (up to 3" in width) with treats.  Roll down the top of the bag, secure and then attach to the inside of remaining tag flap.  I used double sided tape.
 Pass out the bags and watch the smiles!
Entered into the following Challenges:

Thursday, February 13, 2014

Valentine's Week: Flower Love Card

Let's celebrate this week leading to Valentine's Day with all VDay projects!  
This card was created using scrap designer paper that featured a well placed "Love" printing.  I built the rest of the card around that...a white doily accented with pink and white Stickles, a Stickled edges pink flower with a gem center and a punched scroll border--also accented with....STICKLES dots!
Entered into the following Challenges:
Divas By Design: With Love
Fab 'n' Funky--#203 Love/Valentine
Rhedd and Rosies--Love is in the Air
The Cheerful Stamp Pad--#79 Love/Valentine
My Sheri Crafts--#126 Valentine
Open-Minded Crafting Fun--#3 Show Some Love
In the Pink--#37 Valentines A Little Pink Love

Wednesday, February 12, 2014

Valentine's Week: LOVE inspiration

Let's celebrate this week leading to Valentine's Day with all VDay projects!  
Here's a look at the Creative Cutting Challenge Design Team's LOVE projects, featured this week over at that blog:
A tag from Heather
A Smashbook layout from Tina
A card from Shelissa
A shaped card from Ruth
A card from Octavia
A card from Carolyn
Home decor from Carmen
Aren't they all fabulous?!  They do such a great job using my SVG files.  If you want more info, would like links to a Designer's blog, or would like to play along, please click over to:  Creative Cutting Challenge.


Tuesday, February 11, 2014

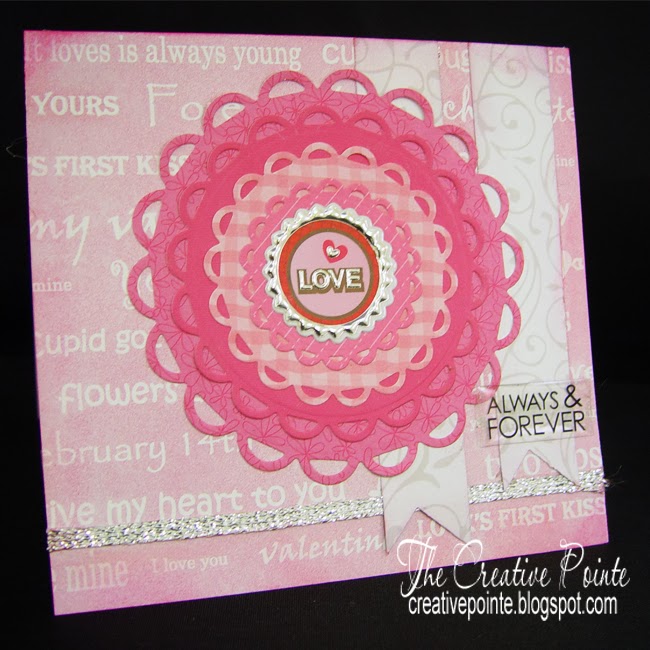
Valentine's Week: "Always & Forever" Card

Let's celebrate this week leading to Valentine's Day with all VDay projects!  
This card was created using Spellbinders dies (Lacey Circles) and various pink scrap papers.  
 
In the center of the layers is a shiny sticker.
Banners of scrap paper are layered under the circles and over the metallic ribbon.
The sentiment is an acrylic piece.
Entered Into the Following Challenges:

Monday, February 10, 2014

Valentine's Week: "With Love" Card

Let's celebrate this week leading to Valentine's Day with all VDay projects!  
Here's a card I made using the We R Memory Keepers Mini 8 Punch (Rose) as the main feature.  I cropped, swiped on Distress Ink along the edges and added heart stickers to it.   Over that I added lace and ribbon.  The sentiment is an acrylic piece with a piece of pink paper behind it.
Entered into the following Challenges:
The Cheerful Stamp Pad--#79 Love/Valentine
My Sheri Crafts--#126 Valentine
Open Minded Crafting Fun--#3 Show Some Love
Sugar Creek Hollow--#79 Love and Adore
Crafty Ribbons--#75 Anything Goes with Ribbon
In the Pink--#37 Valentines
Simon Says Stamp Wednesday--Have a Heart

Friday, February 7, 2014

No Place Like HOME blocks

Here's the back side of the Valentine blocks I featured earlier this week.  I used the same technique to apply the paper and letters. 
The removable accent for this side is another dowel with a banner and topped with a sweet bird.  I used Glossy Accents around the frame portion of the bird and added a beige gem for the eye.
Entered Into the Following Challenges:

Tuesday, February 4, 2014

LWD Tuesday Tool Review: Tonic - Tim Holtz Non- Stick Micro Serrated Scissors

For my first Lone Wolf Designs Design Team "Tuesday Tool Review", I'm featuring one of the tools I use all the time--Tonic/Tim Holtz Scissors.  These will cut almost anything in your studio and to demonstrate that, I prepared a little video.  Sorry, I wish it would have had more "bells and whistles" but after trying to figure out the editing feature on YouTube for over an hour, I gave up.  But it will give an idea of what I use my scissors for...
One thing I forgot to mention in the video is that the scissors also have a protective plastic cap.
Tim Holtz introduced a new larger pair of shears that will be coming out soon.  You can get a peek at them HERE.

I hoped you enjoyed this Tool Review!  You can find the Tonic - Tim Holtz Non- Stick Micro Serrated Scissors and much more for your crafting projects at 25% Off MSRP at Lone Wolf Designs, LLC.  All you have to do is join the LWD Discount Retail Sales Facebook group.  If you haven't joined us yet, you're paying too much for your craft supplies!

Monday, February 3, 2014

Valentine LOVE blocks

For this week's Creative Cutting Challenge DT project, I made these wooden blocks to fit the two week long "LOVE" theme.  Made of scrap 2 x 4 lumber, this project was super easy to make. The rosette accent is removable, and the blocks reversible...a piece you can leave out all year.  (You'll have to check back later this week to see the flip side.) 
 Here's a close up of the removable rosette accent.  I punched the larger rosette and then used my Martha Stewart score board to make the rosette.  On top of that is a pink scalloped heart layer I cut with my my electronic cutter.  Then another smaller rosette topped with the cupid file from my Valentine SVG set.  A stamped banner was added between the layers and I used gold and red Stickles on the accent layers.  I hot glued the whole thing to a painted wooden dowel and added a punched cardstock circle to the back to finish it off.
Here's how I made the blocks...
 I grabbed these blocks from my in-laws new house scrap pile...already cut .  I knew I could make something out them!  I just lightly sanded the edges and drilled a hole to fit the dowel I wanted to use.
 I painted the dowel, block edges and slightly up on the fronts and backs in an off white acrylic paint color that matched the paper I was going to use.
 I cut the paper slightly smaller than the blocks and attached to the wood with Studio Multi-Medium Matte.
Next I used  coordinating red paint to shade along the edges of the paper and a fine black Sharpie to create the hit and miss border.  I also took more of the off white paint and blended areas in the middle to emphasis the letters.
I cut the letters from red cardstock and also cut a shadow layer from black cardstock using my electronic cutter.   I attached the letters to the blocks with Multi Medium and then went over the top of the letters with red Stickles.
And there you have it...a LOVE-ly project that you can use to decorate your home this Valentine season!  Or change the accent to a bridal theme and use as a wedding or shower decoration.  
If you use an electronic cutter, I hope you'll join in the "Love" Challenge.  Just click Here for information.

Saturday, February 1, 2014

Tool Man Birthday Card

I finally got a chance to use the ruler embossing folder from Tim Holtz and the tool stamp set from Crafty Secrets when I made this card for my brother's birthday.  Perfect for the guy who works with his hands!
Entered into the following Challenges: