Monday, April 29, 2013

Wedding Shower Card

Today I'm featuring my Design Team submission for the latest Creative Cutting Challenge--Weddings!  Our family has weddings on the brain right now as our youngest sister is planning her nuptials for June 29th.  In fact the bridal shower is this weekend and as I KNOW she will see this card before then, I'm going to give it to her groom-to-be.  He will be making a brief appearance at the shower (so all the ladies get a good look at the guy who nabbed our sister!) and I've got a small gift for him from his newest nephew-to-be (Gus the bulldog!) that I'll attach this card to.
Here are the card details:
I used the wedding car SVG file from my Wedding Set
that you can get HERE.  I cut it from gray cardstock and layered it over a black cardstock shadow.  I cut the sign/bumper from white cardstock and created the shadowing using a Black Soot Distress Marker and water pen.  I hand wrote the details on the sign with a thin Sharpie.  I cut off the diecut's tail lights and instead added these pink jewel hearts.  I then attached the diecut to a scrap of black pinstriped DSP.  That was  layered onto pink cardstock and gray cardstock, both distressed with Pumice Stone Distress Ink.  I had a scrap piece of  "Congratulations" DSP and simply cut one of the words out and attached it to the card. 

If you use SVG (or similar cut files) we'd LOVE for you to play along with this Wedding Challenge!  
And even if you don't use SVG files or can't play along, be sure to check out the awesome Wedding inspiration from the very talented Design Team.  Just click over HERE.
Entered into the following Challenges:

Friday, April 26, 2013

Graduation Iris Fold Card

As today's Designer over at CARD A DAY BLOG I'm featuring this iris fold graduation card.  I've been making lots of iris fold cards as shower gifts so I thought, why not use one for a graduation card?  Something  a little non-traditional (from caps/gowns/tassels) and with the pink toned papers, just enough of a "girlie" touch too.  Here are the details:
This iris folding pattern can be found everywhere on the internet.  It's the basic square and I created a SVG file to be able to cut multiples.  The card front was cut from black cardstock.  If you have a square punch you could use a proportion wheel to adjust the pattern to your punch size.  Or just do it the old fashioned way--hand cut!
I picked four coordinating papers--this is a great way to use up those scraps or papers with patterns you're not crazy about any longer.  The center "iris" is black cardstock that I added white rub on numbers to.
A strip of yellow washi tape, a punched label "Congrats" (see note on this below) and three clear square gems completed the top of the card.  I attached this to a piece of subtle patterned yellow cardstock cut to A6 Size.

A Note on Label Makers:
I recently purchased the Smash Label Maker and I have to say that I am NOT a fan of this product.  For my review, read below.

I'd been wanting a label maker for a while.  I remember my parents had one when I was a kid and figured it couldn't be hard to find.  Must have been looking in the wrong places because I hadn't found it!  Finally I found an old Dymo at the thrift store for $1.  I was thrilled.  Got it home, it didn't work.  Oh well, out a buck.  Then at the LSS I saw this and paid $10 for it.  First time I used it I discovered (should have looked more closely in the store) that there are no numbers on it.  Then a piece broke off from the inside before I'd punched two letters.  Must have been the cutting mechanism because I had to use scissors (and lots more tape) to cut it off.  This week I happened to visit my local hardware store and was thrilled to find the Dymo Embossing Label Maker for $13.  Just a few dollars more but it seems to be much sturdier AND it has numbers!  I'll give a review when I give it a whirl.
Entered into the following Challenges:
(Washi tape)


Saturday, April 20, 2013

Painted Roses on a Bucket

The last bridal shower prize currently finished is this bucket.   This is the little pail that you can get in any hardware store's paint department.  I turned it into a shabby chic container using a pattern I adapted from  Patricia Rawlinson (Quick & Easy Painting June 2010).  As with any metal item I paint,  I apply JoSonja's All Purpose Sealer on the outer surface of the bucket before painting.  I used Glossy Accents to attach the wooden ball knob feet.
I didn't think the shiny inside matched my "shabby chic" theme so I used torn book pages and Mod Podge to line the bucket.  I wrapped the handle with white seam binding dyed with Distress Stain.  
Here's a close up of the roses that go all around the bucket.  If you'd like to see more of Patricia Rawlinson's designs, you can check out her website HERE.

Thursday, April 18, 2013

Get Well Card

Here's another iris fold card.  For this card, I used a larger piece of one of the same folded strips to put behind the white panel portion.  Quick and easy but looks oh so fancy!  Stay tuned for more iris fold samples as I've been making quite of few of these lately.
Entered Into the Following Challenges:

Monday, April 15, 2013

Mother's Day Card & Challenge

The two week challenge theme over at CREATIVE CUTTING CHALLENGE is "Mother's Day Cards".  If you're an electronic cutter who uses SVG (or similar files), I hope you'll play along...there is a prize!  But even if you don't/can't participate, there is a lot of great Mother's Day card inspiration for everyone from the Design Team.  It's worth the click to head over to see!  For my DT submission, I used the card file from my newest SVG set: 
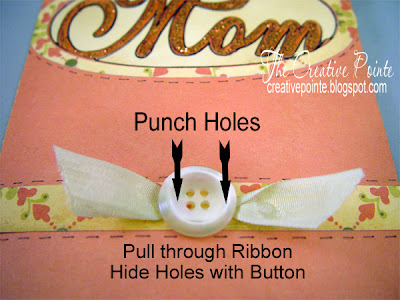
I cut the complete card from double sided cardstock (We R Memory Keepers "Precious Metal").  I accented the terracotta colored front of the card with pieces cut from the coordinating print which is on the inside of the card.  I created and cut an oval frame to go around the "Mom" and the strip near the bottom.  Behind the "Mom" cut out, I added ivory cardstock that I lightly distressed with Vintage Photo DI.  After outlining "Mom" with a thin black Sharpie, I added Copper Stickles.  I used the Sharpie to add faux stitching around the oval and on either side of the strip.  Finally I added the faux bow...an easy accent!  Just punch two holes (size depending on width of ribbon you're going to use), pull a bit of ribbon through and then finish with a button.  I attached mine with a glue dot.
Entered into the Following Challenges:

Sunday, April 14, 2013

Blog Candy Winner

Random winner of the two embellishments packs is

TerriM56

Blogger TerriM56 said...
adorable, and I have a new grandson and 2 new granddaughters!!!!
Terri, please email me your address before April 20th to claim your prize:
Creative@avci.net


Friday, April 12, 2013

Painted Slates

More of the bridal shower prizes...today I'm showing off a couple of painted slates.  Years ago I came into a large stash of old slate roof tiles.  I LOVE painting on them...they are perfect for outdoors.  I have a slate cutter and cut them to the size and shape I want to work with.  I then use a drill press with a special bit to put in the hanging holes.
The "Welcome" sign is an adaption of a pattern by Patricia Rawlinson (Paintworks August 2012).  This is a very loose style...perfect for quick painting!  And with a design such as this, it's very easy to freehand, which also saves time.  If you'd like to see more of Patricia's patterns, check out her website HERE.

The other slate project I painted took a bit longer.  I cut the slate in this arched shape and painted the same design on both sides.  It's an adaption of a pattern by Liz Miller (Quick & Easy Painting August 2010).  Check out Liz's website HERE.
I drilled holes along the bottom and strung chimes.
Both slate pieces were sealed multiple times with an exterior varnish.  The slates I have in my own flower gardens have held up very well.  Every few years I'll put an extra coat of varnish on them.  


Wednesday, April 10, 2013

Painted Heart Tin

Next month I'll be co-hosting a bridal shower for my youngest sister (you know her as THE PAPER SQUIRREL) so I've been creating handcrafted prizes.  One of the items I painted is this little heart tin.  It started out as a thrift store find (15 cents!).
But after priming and painting using an adaption of a pattern by Shara Reiner (You can find it in The Decorative Painter #1 2008),
 I turned it into a sweet little sewing kit!
I paint a lot of Shara's patterns...they are cute, funky and easy to paint.  


Friday, April 5, 2013

Pocket Watch Birthday Card

Even though I can make any diecut I want using SCAL and my electronic cutter, there are some steel rule dies I just have to buy...and this new pocket watch die from Tim Holtz was one of them!
I've been cutting heavy chipboard with it and the new circle dies to make some cool frames (keep watching for those) but the first complete project is this birthday card I made for a relative.  The clock face stamp fit perfectly and if the recipient is looking for it, he'll notice that the hands point to his upcoming age--4 & 2!  I used Graphic 45 paper for the main background and a coordinating scrap of black striped paper.  I added Glossy Accents on the clock hands to give them dimension.  The sentiment  is an acrylic embellishment from Cloud 9.  I thought about continuing inside with the wording "because you don't have much time left!" but I figured that would be too mean.  lol
Don't forget about the 
Click HERE if you are a follower to leave your comment!

Monday, April 1, 2013

Baby Cards and Blog Candy

The Challenge theme for the next two weeks over at CREATIVE CUTTING CHALLENGE is "For Baby".  Lots of great Design Team inspiration, including these three new SVG files:
Get the file HERE
I love how these baby buggy cards came out!  The SVG file is sized to fit the A6 envelope (although you can make them any size you wish).  I embossed the buggy bodies and added buttons as wheel hub cabs.  I used coordinating markers to add detail to the handles and a pearl for the top hinge.

Get the file HERE
This SVG also comes sized to fit a A6 envelope (so you don't have to guess).  I dressed the card up with coordinating letters stamped on and punched from white cardstock.  Layered over punched orange cardstock.  Added a white gel pen highlight in his eye and a nostril drawn on with a brown marker.

Get the file HERE
Finally this "Special Delivery" file.  I think it would be a great birth announcement file!  The card features diecuts using two shades of blue cardstock and white cardstock.  I stamped "BOY" on the sack using white embossing powder.  The eye was drawn in using a blue marker.
To celebrate these new baby files, I'm offering ...
Good luck and please join us over at CREATIVE CUTTING CHALLENGE.  
You just might win a gift certificate to my online store!
Entered into the following Challenges