

Here's a fun and easy project to make that would be perfect
to present a small gift to a best girlfriend, sister or mom.
Just a few supplies are needed:
- (2) 8.5 " x 11" pieces of card stock (one for inner box and one for purse flaps) and one 12" x 12" piece of decorative paper or card stock
- Scissors and template (below) or electronic cutting machine and SVG (below)
- Score board (optional)
- Embossing folders (optional)
- Double sided tape or glue stick
- Embellishments: buttons, buckles, gems, etc.
Directions:

1. Cut three pieces from one of your pieces of 8.5" x 11" card stock. This will be the inside "box" of the bag. Cut one 5" x 11" piece and two 2" x 5.25" pieces .

2. Score the pieces. The large piece should be scored at 4.75" and at 6.25" This will create a center section that measures 1.5" wide and each side section should measure 5" x 4.75". Each smaller piece should be scored at .25" on the long top and bottom edges. On one short side, score at .5" and notch cut the corners as shown in the picture above.

3. Now we're going to assemble the box portion. Layout the long piece so that the folds are valley side up. Glue the .5" folded and notched side of each of the short pieces to the sides of the long center portion. Both of these side piece's folds should also be valley side up. This will become the inside of the box.

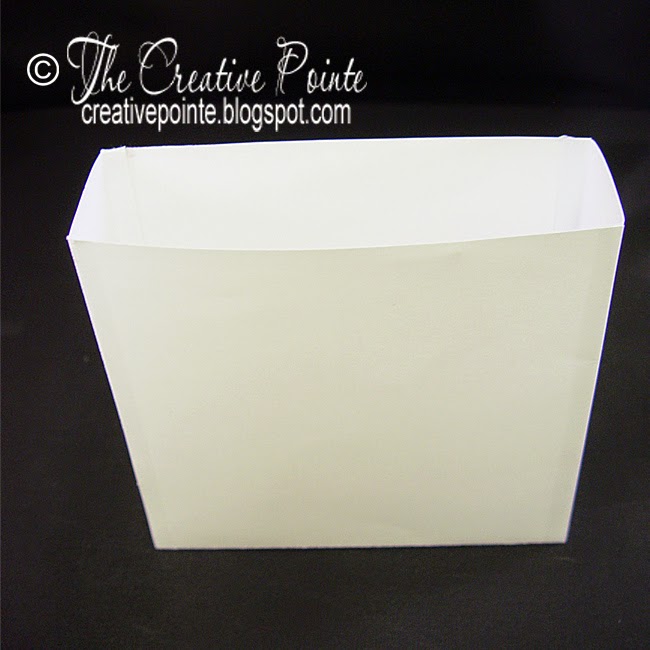
4. To finish the box portion, start with one side of the large piece. Add glue to the short sides scored edges and line up and adhere to edge of the large piece. Do the same to the other side. You should now have a "box" that looks like this:
5. Now we'll add the decorative paper purse shapes to this center box portion. To create this, you'll need the 12" x 12" piece of decorative paper. Cut two purse shapes from this paper. Then cut two flap shapes from coordinating paper. If you have an electronic cutter, you can grab the free SVG for this HERE. If you don't, you can cut it by hand using a template you can get HERE.

6. Assemble the outer pieces by gluing the flaps to the purses. If you wish to emboss the flaps, do this prior to attaching to the purse.

7. To finish, we'll attach the outer purse pieces to the inner box. The easiest way to do this is to lay one purse side face down. Covering a side of the inner box with glue, press it to the back of the purse cutout, lining up the bottom so that it's flush and so that it's centered on the sides. Do the same with the other purse cutout. Embellish as desired. Fill with a gift and top with tissue paper!
Entered Into The Following Challenges:
4 comments:
Sweet purses. :-D Thank you for sharing tutorial and for joining us at Crafty Creations Challenges this fortnight. :-D I hope to see you again. :-D
Milka DT
Very cute! Thanks for the tutorial!
Thank you for joining us at Decorate to Celebrate!
Lilian
http://theleafstudio.blogspot.com
Fabulous creation with lovely colors and design. Thanks for sharing with us at Creative Moments. Agnieszka DT
Adorable purse card. Thank you for joining Decorate to Celebrate.
Hugs
Norma
Post a Comment