Monday, October 31, 2011

Happy Halloween! SVG: Pirate Flag

I took this picture of Louie in 2001.
It's not the best picture of the bunch.
No, that picture belongs to AOL, as
Louie won the "Pets in Costume"
contest they ran that year.  He won us
a DVD player and a bunch of DVDs.
This was the second photo contest
Louie had won and he was only two
years old then.  He loved to pose
for the camera as long as I paid him...
in dog biscuits!!

So in honor of Pirate Louie and Halloween pirates everywhere,
I have a freebie SVG for you
Get the file HERE.
Hope everyone has a happy and safe Halloween!

Sunday, October 30, 2011

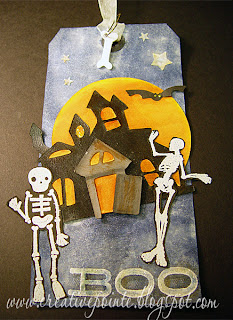
"BOO" Tag

My last Halloween project of the year is this tag.
Tags are so fun and quick to make...a perfect way to try out new
techniques too.  Like the "Perfect Distress" technique from
Here's how I made the tag:
1.  Using Chipped Sapphire Distress Ink, I pressed it here and there around the tag.
I left various spots bare on purpose...to give the illusion of a cloudy night at the top.
2.  Using my mister with a mixture of white Perfect Pearls and water (the technique shown on Tim's blog) I misted the tag.  The misting caused the Distress Ink to blend and left a nice sparkle and sheen on the background.
3.  Next I used my HAUNTED HOUSE SVG file to create the main element using scrap black, gray and orange cardstock.  I distressed everything with Vintage Photo DI and added Yellow Stickles to the upstairs oval window and the bat's eyes.  I also used Distress Crackle paint on the black part of the house but it is too hard to see, so I would leave that step out if I were to do it again.
4.  I stamped "BOO" with Versamark and embossed with white EP.  I shaded around the letters with Chipped Sapphire and on top of the letters with Vintage Photo.  I also added Clear Rock Candy Distress Stickles on top of the letters.
5.  I stamped the two skeletons with white EP on black cardstock and fussy cut them out.  I dragged them through the extra Vintage Photo DI I had on my craft mat to distress them as well.
6.  The stars were punched from white cardstock and using the water pen I added the same colors of DI and Rock Candy Stickles.
7.  Everything was attached using a glue stick or ATG.  The bone on the ribbon was made out of Shrinky Dinks.  I just hand cut a bone shape, punched a hanging hole and used my heat gun to shrink.
This tag is entered into the following Challenges:

Supplies:
Manilla Tag
Cardstock: black, yellow, gray, white scraps for house, stars & skeletons
Stamps: Stampers Anonymous "Mini Halloween" and an unknown set in my stash
Distress Inks--"Chipped Sapphire", Vintage Photo"
Embossing Powder:  White
Die cuts: "JOY Ornament" and "Bracket Element" SVG s, both from The Creative Pointe
Punches: Martha Stewart star punch, unknown punch in my stash
Stickles:  Distress "Rock Candy", "Yellow"
Adhesive: ATG & glue stick
Misc:  ribbon, Shrinky Dinks-white, pin
Electronic cutter: Cricut and SCAL software

Friday, October 28, 2011

New In The Store

Started making Christmas cards yet? 
If you're looking for some sweet inspiration, please check out my newest SVG files:
Christmas Candy
Available HERE

Joy Ornament
Available HERE

Angels
Available HERE

Christmas Bells
Available HERE

If you are still working on those last minute Halloween items or need
some Thanksgiving art, I have those files available too!
Please check out the store HERE.
And if you are a Facebook fan,
I have a special coupon code for you there all this weekend.

Thursday, October 27, 2011

JOY Ornament Card & SVG: Bracket Element

If you've popped over from the "Card A Day Blog",
Welcome!
I hope you look around and see what else I have for you.
(If you love to make cards and are looking for inspiration,
be sure to checked out the Card A Day Blog
A variety of talented designers put up a new card each and every day)

Tomorrow (October 28th) I am the featured designer over at CADB and I have a Christmas card that features a paper pieced ornament.  If you have never tried paper piecing, it's an easy way to get a beautiful, one-of-a-kind element.  If you have an electronic cutter, it's even easier!  For this card I used Sure Cuts A Lot (electronic cutter program) and this SVG file (available from Cut and Create):
Because SCAL features "what you see is what you cut" on your computer screen, it's very easy to use up your scraps.  You simply place your papers on the mat and make one pass at cutting.
TIP:  The other thing I like to do when paper piecing is make each layer "pop" by shading and/or highlighting.  Lately I've been doing that using Distress Inks and a water pen.  I simply press the DIs onto my craft mat and pick up colors with the water pen.  Then I shade onto the paper.  So, how do I choose what ink colors to use?  Having all your Distress Inks placed onto a swatch sheet (which you can get from Ranger HERE) makes it easy.  I simply hold up the paper I'm going to use to the swatch sheet and make the best match.  If there isn't a close match, Vintage Photo is my "go to" ink for shading.
Here's how I created the card: 
1.  I cut the SVG file using a white base, scrap Christmas Paper for ornament,  scrap green for oval, scrap red for bow and letters and scrap gray for cap.  (If you're not able to use SVGs, use a comparable diecut.)
2.  Shaded around edges of ornament shape and oval frame with Distress Ink (Peeled Paint).  Shaded around bow with DI (Walnut Stain) and shaded bottom of cap with (Black Soot) DI.
3.  Adhered all pieces of the ornament together.  Used Stickles to add sparkle to letters (Fired Brick), cap (Silver) and ribbon (Rock Candy).
4.  Cut piece of ivory CS and stamped background using Shadow ink. 
5.  With scrap strip of the same red CS used on bow and letters, I punched the border the width of the ivory CS.  Adhered to ivory CS and then attached ornament element.
6.  Cut bracket element out of patterned paper using this SVG file, (available free HERE.   Again, if you are unable to use SVGs, use a comparable diecut or hand cut)  Attached the top two layers to this element and then adhered to green cardstock that had been folded into a card.
7.  Added gems.
Supplies:
Cardstock: green, ivory, red, scraps for ornament
Patterned Paper: DCWV "Cream & Green Holly"
Stamps: Hero Arts Flourish Background
Ink: Hero Arts Shadow Ink "Soft Sand", Distress Inks--"Walnut Stain", "Black Soot" & "Peeled Paint"
Die cuts: "JOY Ornament" and "Bracket Element" SVG s, both from The Creative Pointe
Punches: Martha Stewart border punch
Stickles:  Distress "Fired Brick" & "Rock Candy", "Silver"
Adhesive: ATG
Misc:  Gems
Electronic cutter: Cricut and SCAL software

Entered into the following Challenges:

Monday, October 24, 2011

SVG: Spooky Tree

Remember I teased you about what the last Halloween file was?
Well, it's a spooky tree that you can put all your Jack O'Lanterns under!
Get the file HERE.

If you'd like to get the Coffin Card file featured in the post below,
Just follow me on FACEBOOK  and post a picture of a
project you've created using one of my SVG or digital stamp files.

Sunday, October 23, 2011

Coffin Card

I'd been thinking of making some shaped card SVGs again and thought a coffin card
would be perfect for Halloween.  The black base is the actual card and then I created
3 different tops (bat, cross, plain and "RIP" letters) to go on top of it.  
You can purchase this SVG file HERE
I thought that this card would be perfect for Grungy Monday's "Tim in 10" Challenge which requires you to make a card in under ten minutes using products from Tim Holtz.  That is the beauty of cutting SVG files on your electronic cutter....very quick and easy!  So here is how I created this card:
1.  I diecut the card and the bat top on my Cricut.  Base:  black Cardstock, Top:  gray Cardstock.
2.  Stamped the top with the woodgrain stamp from Close to my Heart's "Universal Backgrounds" stamp and Black Soot Distress Ink.  Then I blended the ink around the edges.
3.  Next I used the cobweb stamp from Tim Holtz's "Mini Halloween" set.  I embossed with Distress Embossing Ink and white EP.
4.  On a piece of scrap gray cardstock, I stamped the sentiment (also from the Mini Halloween set) using Archival Jet Black ink.  I hand cut the jagged edges and attached it to the card.
5.  Finally I added Black Soot Distress Stickles to the bat and Clear Rock Candy Distress Crackle Paint to the sign.
There it was...a card done in under ten minutes! 
(It needed longer than that for the Stickles and Crackle Paint to dry, but the card was done....quick and easy)
Here are the Challenges I entered this card into:

Thursday, October 20, 2011

A Facebook Freebie

As I mentioned yesterday, I'm paying a little more attention 
to my Facebook page for a couple of days. 
I hope you'll "Like" The Creative Pointe. 
As a little bribe...I mean GIFT...for my Facebook followers,
I'm giving away this cute Floral Frame SVG file:
(Sorry, cute picture of Louie not included!)
Just click on my FACEBOOK  page for the details,
but hurry, the offer expires tomorrow.

Wednesday, October 19, 2011

Facebook Giveaways

I'll be posting special giveaways from now until Halloween over on my FACEBOOK  page. 
First up is one of my brand new SVG Christmas Sets (not yet available in the store):

Angels

Christmas Bells

If you'd like a chance to win, just click over there and "Like" The Creative Pointe!
And if you miss out on this one, stay tuned over on Facebook...
there will be more chances to win SVG files and other goodies.

Monday, October 17, 2011

SVG: Jack Pumpkin #4

Here he is...the last of the Jack O' Lantern SVG freebies
EDIT:
Halloween files may now be found at my Etsy store:

I have one more Halloween freebie for you. 
Can you guess what it is?  Here's a hint....
You could put all four jack o'lanterns under it!

Looking for more Halloween and Fall SVGs?
I have these available for purchase:


Saturday, October 15, 2011

"Merry Christmas" Snowflake Card

Today I'm showcasing the last of the snowflake themed Christmas cards I made. 
This card used the same techniques as the previous cards,
so I'll just do a brief description...
Base of the card (5.5" x 8.5") is again white cardstock that was stamped with Versamark and embossed with white EP.  Then I pressed Broken China Distress Ink onto the paper, sprayed with pearlized water and buffed off the stamped images with a dry cloth.
 Down the center of the card I glued a piece of silver ribbon.  I then cut two other pieces of white cardstock.  On one (3" x 4") I did the same technique as the base but used Tumbled Glass DI.  Once it was dry I punched small snowflakes from foil tape and added them to the top of the trees.  On the center tree I added a clear gem and on the other trees (and on various snowflakes) I added White Opal Perfect Pearls.  I used the other piece of cardstock (3.25" x 4.25") as a mat.  These were adhered together and then over the ribbon.  I cut another piece of ribbon, tied it into a bow and glued under the matted portion.  Finally I cut two oval pieces of cardstock using my Coluzzle.  The top piece is a coordinating color of cardstock.  To that I added the silver foil "Merry Christmas" sticker.  The bottom mat piece is white cardstock.  These were adhered together and then to the card.
This card is entered into the following Challenges:

Thursday, October 13, 2011

Sharing: Accordian Fold Gift Box

Today we are going to take a peek at what
Creative Team member Bonnie has been up to lately...
An accordion fold gift box with cards!
This is just the cutest idea. 
Fill it with cards and give as an awesome Christmas and/or hostess gift.

Bonnie has included the video tutorial on her blog
showing how to make the box.
 It looks really easy!
It also looks like fun to decorate the box. 
Bonnie added the fan fold flower (rosette) to
hide the magnet that holds the lid closed. 
On top of that is one of the lovely rolled roses she made
(don't you love the pearl in the center?) using my file:
Rolled Rose SVG set can be purchased HERE.
You'll want to check out Bonnie's BLOG for all the great details. 
Be sure to scroll up to her other posts as she
shows the lovely cards she made to go INTO the box.

Tuesday, October 11, 2011

Trick or Treat Pocket Card

I made this card using images from a digital collage sheet I downloaded from the SUGAR CREEK HOLLOW site.  Their challenge was to use elements from this collage in your entry.  I decided to make a pocket card.   
Here are the details:
1.  For the base I cut a piece of black cardstock slightly smaller than 4.24" x 5.5" and stamped spiderwebs all over the top two thirds.  I used a Tim Holtz spiderweb stamp (http://www.timholtz.com/), Versamark and white embossing powder.
2.  Next I cut a piece of designer paper the width of my base sheet and then hand cut the diamond edge at the top.  Using my tape gun, I adhered the designer paper to the black paper on the bottom and sides, leaving the top open for the pocket.
3.  The purple frame is an element from the collage sheet.  I added the "Trick or Treat" sentiment with a stamp, Versamark and black embossing powder.
4.  I created the three "brads" to the left of the frame using elements from the collage sheet.  I didn't like the colors of the brad/gem elements provided so I created my own by punching circles from the flower and clover collage images.  Then I added Glossy Accents to give them dimension.
5.  Next I worked on the tag.  This was a black cardstock/metal rim tag I'd had in my stash.  I added more spiderwebs to the top and then used the spooky boy, "Boo" tag, piece of green border and the purple spider from the collage sheet.  I added Glossy Accents to the spider's body and legs and when it was dry, fussy cut it out and attached it to the boy's head.  I also added green Stickle eyes to the spider.
6.  I cropped the boy figure down and cut his hands so he could "hold" the tag.  All the pieces were glued to the tag with GA and a glue stick.  I added the little fiber piece to the tag and did some highlights on the boys sleeves with white watercolor pencil.  His buttons are green Stickles.
7.  I broke open my brand new package of ivory seam binding to make the matching tag ribbon.  I took bright green ink and rubbed along the seam binding.  Then using a checkered stamp and Black Archival ink, I stamped the design on top.  Let it all dry for a few minutes then added it to the tag.
8.  Finally I adhered the the base to a piece of purple card stock that I had cut in half and scored at 4.25" x 5.5", leaving equal edges of the purple showing above and below the base.

It's a little hard to see the spider in the photo (because of the glossiness) but he's there just peeking over the diamond edge of the pocket.  And when you pull the tag up, you get the surprise "Boo" of the creepy little guy upon whom the spider sits!

This card is entered into the following Challenges:
Monday, October 10, 2011

SVG: Jack Pumpkin #3

Hope you don't mind me flipping back and forth between Christmas and Halloween. 
The Card A Day Blog is running Christmas cards only from now through December and I've been designing a few cards for them.  But today we are back to Halloween with number three of the little Jack O'Lantern pumpkins.
EDIT:
Halloween files may now be found at my Etsy store:

Sunday, October 9, 2011

"Let It Snow" Card

Well, it's been strange putting this card up when today we had temps in the 80's.
The sun was shining and making the colors on the trees just glow....beautiful!!!
But, being "Up In Northern Michigan" there is a good chance that we'll have snow next week, so I guess it's not too early for this card after all.
Once again I incorporated a few of the techniques Jennifer McGuire showcased
in her online class.
Design Details:
1.  Bottom layer (5.5" x 4.25") is white cardstock.  The snowflakes were stamped with Versamark and then heat embossed with clear embossing powder.  Tumbled Glass Distress Ink was applied to the cardstock and then the ink was buffed off of the embossed areas with a dry towel.  The entire piece of cardstock was spritzed with pearlized water to blend the DI.
2.  Next layer is 3" x 3.75" of white cardstock that I applied Broken China Distress Ink to and spritzed with the pearlized water.  After both layers were complete dry, I adhered them together.
3.  Next I embossed a 3" x 3.75" piece of acetate using a snowflake embossing folder.  I used a recyled piece of packaging for this and the embossed snowflakes really glitter in the light!
4.  I applied a line of Glossy Accents across the top of the card in the center and attached the acetate.  Then over that line of GA, I attached the ribbon, also using Glossy Accents.  The ribbon hides the GA from showing through the acetate.
5.  I used white embossing powder on the chipboard snowflake and attached it to the ribbon with a piece of foam dot and stuck a clear gem in the center.
6.  On a scrap piece of white cardstock, I applied Broken China DI and again spritzed with the pearlized water.  Once it was dry, I stamped the sentiment with Versamark and embossed with white embossing powder.  Then, using a punch, I created the tag and attached it to the snowflake with silver wire.
I wish the pictures could show the amount of shine and shimmer this really card has.  The pearlized water gives it such a nice sheen and the acetate really sparkles when the light hits it.  It's easy to make the pearlized water.  Just take some perfect pearls powder and mix with water in a mister.  Shake well each time you use it.  Easy Peasy and works fabulously with Distress Inks!

Friday, October 7, 2011

"Joy" Snowflake Christmas Card

If you've jumped over from the Card A Day Blog post....WELCOME! 
I hope you'll take a peek around and consider becoming a follower.

Today I'm featuring a card with a snowflake theme. 
Actually, I started out planning on doing just one card
(to be featured on the "Card A Day BLOG, which I design for)
but I got carried away making the background papers 
and had enough to do three different, but similar themed cards. 
Be sure to check back for details on the other two cards. 
I'll be posting the details over the next few days.

"Joy" Snowflake Card
I used two of the embossing techniques I learned from the recent
"Inspiration Showcase" online class on this card.
Here are the design details:
1.  Base (3.75" x 5") of the card is glossy cardstock that was embossed with the snowflake embossing folder and then the raised portions were sanded until the gloss was removed.  With blue chalk ink, I pressed the ink all over the design.  You can see it was darkest on the sanded raised portions.  There is just a hint of the blue on the glossy portions of the paper.
2.  The top portion is made from 2" x 4" white cardstock.  I took snowflake stamps (Peachy Keen) and stamped with Versamark.  I applied clear embossing powder and then heated to melt the EP.
Next I used Tumbled Glass Distress Ink and pressed it onto the paper.  I lightly buffed off where the snowflakes were embossed and then spritzed with pearlized water.  After it was completely dry, I attached it to the base paper.
3.  I attached the snowflake ribbon with Glossy Accents.
4.  I painted the chipboard snowflake with pearl acrylic paint and after it was dry, also used Glossy Accents to adhere it over the ribbon.
5.  I stamped Broken China Distress ink letters on white cardstock, punched the circles and then used Glossy Accents to stick them to the ribbon. 
6.  Finally, I used white opal Liquid Pearls in the center of the snowflakes and on the points of the chipboard snowflake. 

This card is entered into the following Challenges:

Thursday, October 6, 2011

NEW Thanksgiving SVG Files

If you are planning ahead, I just put up these files in the stores:
Thanksgiving Set One--$2

Thanksgiving Set Two--$2
See the card I made using the turkey above HERE.

You can get them at
(Which I noticed still has all our files at 40% Off...
Hurry, because I think it will end Saturday)

Tuesday, October 4, 2011

SVG: Jack Pumpkin #2

Here is the second of the four jack o'lantern SVG files. 
This one is a little spooky!

EDIT:
This file is no longer free.  You may purchase it HERE

Just want to share a few pics with you from the
Scrapbook Event I attended this weekend....

The Scrappin' Queens
Here we are Saturday morning in all our Queenly attire.
Our group was a little small due to my niece's Homecoming
but we still had a great time for a great cause!
Oh boy, can you tell I had too little sleep the night before?
Yikes!  Hopefully people were dazzled by my crown and earrings
and didn't look too closely at the bags under my eyes!
The Paper Squirrel (aka Vicki) looked cute in her fuzzy crown.
Glossy Accents to the rescue when it broke off of the headband!
BFF Sue put together a ton of pages and because of her orange glitter paper,
we had and extra layer of sparkle!  Thanks to Sue for putting us up
in her lakeside cottage for the weekend.
The Queen Mum wearing her actual bridal crown....it's 52 years old!