Monday, April 28, 2014

Shabby Stenciled Rose Mother's Day Card

Time for another SVG challenge over at Creative Cutting Challenge.  This fortnight the theme is "Mother's Day Cards" and the card above is my submission.  I used a new file, "Stenciled Rose Card Front" that you can get Here
 This file makes it super easy to put together a lovely card for any occasion.  There are several layers so you can get creative with the flower.  The ribbon slide can be sized to fit your width of ribbon and personalized for the recipient.  Now on to the details about this card.
I have to admit that this extremely grungy look was NOT what I started out to create.  In fact, the card was totally done in a "lightly" distressed style and I was working on stamping the inside when a spot of ink on my finger got on the front---oh no!!  Well I certainly didn't want to start over and trying to wipe off the ink with a baby wipe was a total fail.  So, I figured I've got nothing to lose at this point.  I got out the sanding block and went to town.  I also added much more Distress Ink (which I had originally used to shade and highlight the rose and stem).  I made sure to tear and distress the edges of the background paper and after all this abuse, I was actually happier with the card!  A surprising but happy outcome.  Not the usual scenario in my studio!  lol  Below is a look at the little ladybug charm I added to the ribbon.
If you use an electronic cutter, I hope you'll join in the "Mother's Day Card" Challenge and show us your SVG creations! Just click Here for information.
Entered Into the Following Challenges:
Sugar Creek Hollow #85--Tic Tac Toe  (bling (charm)-ribbon-die cut)

Friday, April 25, 2014

Pinterest & Purses Party

I've been showing you things I created for the Chinese Auction held during  the recent "Pinterest & Purses Party" I was involved in.  Today I'm going to share information on the event in case you'd like to do one yourself!  
It started off as an idea to have a silent auction of purses as fundraiser for our community association's Relay For Life team (If you'd like to support me in this year's event, click on this LINK). I knew that we would need something fun to encourage the ladies to stick around for three hours and bid the purses up, so after much thought I remembered another crafter who put on a Pinterest party at her church.  Hmmmm...Pinterest and purses.  What a great combo and a great name for our new event!  
My friend Dorothy was in charge of collecting donations of new and gently used purses.  We had all kinds--from name brand purses (Coach, Dooney & Burke, and Gucci) to ones from Wal-Mart...all of them either new or in pristine condition.  Some purses came with matching scarves.  She sweetened the deal with gift boxes and envelopes that went with every purse, containing additional items and/or gift certificates worth up to $15.  There was also a little favor box of nail polish for each purse purchased.  The photo above shows just some of the purses we had up for auction. At the end of the day we raised over $900 in the purse auction.  
One of the most important parts of the "Pinterest" side of the party was getting recipes and the prepared dish from volunteers.  The picture above shows just one table of treats.  I had almost twenty different food items to sample, thanks to the ladies from my community.  Each dish was presented in bite size portions and had a little place card in front of it with the name of the recipe.  Attendees made notes of what they liked and once home, could go the special "Pinterest & Purses Party 2014" Pinterest board to get all the recipes.  A really fun way to try lots of different recipes!
The other part of the "Pinterest" portion was the crafts.  There were four craft stations where attendees could do a fun make-it-take-it project.  I had friends and family serve as "instructors" and each project had complete instructions on the "Pinterest & Purses Party 2014" Pinterest board in case they wanted to make more at home.
We also had two massage therapists offering chair massages for $1 per minute and they kindly donated half of their earnings.  Door prizes were awarded and we had a table set up with information on our Relay team.  For our first year, we had a decent turn out of 49 attendees and raised over $1,300.  The ladies had a great time and I had lots of "are you going to do this again?" questions.  Dorothy and I agreed to do it all again next year...and we're hoping for an even bigger 2015 event!

Thursday, April 24, 2014

Live Life Painting

Here's the last of the art created to be auctioned off at the recent "Pinterest & Purses Party" (check back tomorrow for complete details on that).  This is an acrylic painting on canvas.  I modified a design by Heath Darby (Quick & Easy Painting, April 2008).  I added ivory Liquid Pearl centers to the border flowers and painted the white washed frame's inner molding to match the green stripes.

Wednesday, April 23, 2014

Decorated Garden Gloves

Another Chinese auction item...decorated garden gloves.  These went with a resin garden sign I painted and forgot to take a picture of...yikes, it was crazy busy around here a few weeks ago!  Anyway, here's the secret to decorating these gloves...quick and easily done using Sharpie markers!!  Just get a pair of cotton canvas garden gloves and decorate to your heart's content.  Be sure to use a light touch as a little marker goes a long way (bleeding).

Tuesday, April 22, 2014

Painted Wine Glass Holder


Featuring another Chinese auction donation.  This one is the wine set shown above.   It features a hand painted wooden holder.
Here's a close of the grape design.  This is based on a design by Patricia Rawlinson.  I just incorporated it to fit the piece.  Believe it or not, I painted this twice.  The first time I used old varnish.  I noticed that the bottle had a lot of product in the bottom that wasn't mixing.  So being the cheapy  thrifty person I am, I stirred and stirred and used it.  Next morning...horrors!  The entire piece was cloudy!!  Too late to wipe it off and Goof Off didn't help either, except to take off all the varnish and paint.  So I sanded and started again.  Luckily not a complicated or lengthy project.  A valuable lesson learned!

Monday, April 21, 2014

More Altered Clipboards

Last weekend I chaired a new fundraiser for our community's Relay For Life team.  Besides putting the event together, I also contributed  most of the items to the Chinese auction...many of them hand painted or created.  Over the next few posts, I'll share some of these projects with you.  
The first of these is the altered clipboard shown above.  I made this similar to this clipboard but used decorative paper and paint to change a plain brown clipboard into this flowery piece.  A new DecoArt paint product was applied over the center blue painted area, creating a great chalkboard feature to the clipboard.  I painted the "Notes" on so that it's permanent.
I really like this chalkboard coating.  Besides over paint, you can use it on other materials as well:  wood, canvas, paper mache and terra cotta.  It's erasable, washable and durable--lots of fun to create with.
Here's a close up of the floral pieces that were hot glued to the board...

Here'a look at another chalk/clip board I also created.  This one is done in a more manly style.
Same technique as board above.  The "To Do List" and the numbered lines are painted on the board.  I used Vintaj patinas to "grunge up" the clip and added a little clock face to the clip.
I added more paper to the wooden base...

Entered Into the Following Challenges:


Thursday, April 17, 2014

Butterfly Birthday Card

Here's a card based on Pinterest inspiration found HERE.  Stamped yellow cardstock die cut and laid over designer paper.  I used Sizzix dies to create the butterfly openings then added Glossy Accents to the wings and Stickles to the body.  Hand drawn stitching around the card and butterflies.  Tim Holtz tissue tape.

Entered Into the Following Challenge:
As You Like It--Stitching Faux or Real (I like the look of real but faux is easier and thus my favorite!)

Tuesday, April 15, 2014

LWD Tuesday Tool Review: Vintaj Metal Hole Punch 1.5mm

Today for my LWD Tuesday Tool Review, I'm featuring one of my favorite tools...this awesome hole punch from Vintaj.  You might think I use it only on jewelry as Vintaj is known for their lovely vintage style pieces.  Would it surprise you if I told you that I've only used it for jewelry once or twice?  That I use it mainly in my paper and multi-media crafting?  
Well, it's true!  I love the very small hole (1.5 mm) it creates and since it's made to punch holes in jewelry, it can handle every paper craft I throw at it just as well as the metal.  Here are some examples of the materials it goes through with ease:
Grungeboard
I love working with Grungeboard but it can be a really bugger to punch through.  No ordinary paper punch will work...and who wants to haul out the drill press for one project?  Hanging holes were easily punched in the Grungeboard ornament base shown above.  The Vintaj hole punch also handles chipboard with ease.
Cardboard and Cardstock
No matter how many layers, the hole punch goes through!  I really like the size for creating hanging holes.
Tin
I've made lots of altered tin ornaments using the Vintaj hole punch to create hanging holes and holes to attach embellishments.  Using a drill press would have distorted the metal.  Another nice feature is the padded handles on the tool...there is no stress on my hands when punching these tins.  
Metal
Punching through thicker metal is also no problem.  I used the Vintaj punch on this metal coaster with ease.
So there you have it...another versatile tool for your craft room!  I hoped you enjoyed this Tool Review!  You can find the Vintaj Metal Hole Punch and much more for your crafting projects at 25% Off MSRP at Lone Wolf Designs, LLC.  All you have to do is join the LWD Discount Retail Sales Facebook group.  If you haven't joined us yet, you're paying too much for your craft supplies!

Monday, April 14, 2014

Spring "Shower" Gift Bag and a SVG Freebie!

 Springtime seems to be THE time for showers:  personal, bridal and baby.  Last year I was planning a bridal shower and bachelorette party.  This year it's a baby shower...all for the same sister!  So when I decided to make this Watering Can file for the current SVG Cutting Challenge, I thought it would be perfect to incorporate into something shower orientated.

I used a plain white gift bag and created the background from patterned blue and green cardstock, framed in patterned pink cardstock.  The watering can was cut from plain gray cardstock and patterned paper which I shaded with Black Soot Distress Ink.  I used the same ink and a dotted stamp to add the "holes" to the spout.  Liquid Pearls created the "water drops".
The flowers came from the Flower Set One set.  They were cut in different sizes from patterned pink paper and cream cardstock which I shaded with Picked Raspberry Distress Ink.  Pink and white Stickles were added to the flower center swirls.  I also cut leaves (from the Leaves & Branch set) from plain cardstock and patterned green paper.


The heading was cut from cardstock and you can grab it free HERE

If you use an electronic cutter, I hope you'll join in the "Spring" Challenge and show us your SVG creations! Just click Here for information.


Monday, April 7, 2014

Post It Note Holders

Very easy to make and fun to decorate, these Post It Note Holders, make perfect little gifts or shower favors.  I had found a similar project on Pinterest.  That one featured a larger pen holder.  Since I had scored a nice stash of little pencils (like what you'd find on the golf course), I altered the project.

Supplies:
  • Cardstock (7.25" x 3.25")
  • Score Board (I have one by Martha Stewart)
  • Double sided tape
  • Embellishments and ribbon
  • 3" x 3" Post It Note stack
Directions:
On the side of your cardstock you want to be the outside, score your paper at 3.5", making a "mountain" fold.  Turn your cardstock over and on the inside, score your paper at 3.25" and 3.75", making two "valley" folds.
Pinch the fold together and make two cuts up to the fold about 1" to 1.25" in from each side.
Push the snipped center piece so that it pops through to the other side (this will become the pencil holder).
Add double sided tape on the sides of the "mountain" facing the longer side of the paper.  Press down, keeping the pencil holder tab out.
Add a strip of double sided tape to the back of a Post It Note pad and attach to the inside of your holder.  Then decorate, add the pencil and enjoy!

Friday, April 4, 2014

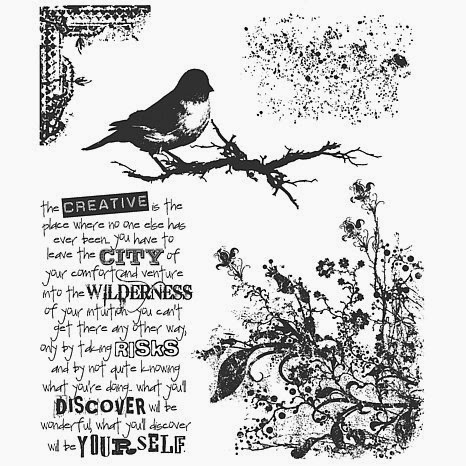
LWD Design Team Showcase: Stampers Anonymous Tim Holtz Cling Mounted Stamps - Urban Tapestry and Tsukineko - StazOn Pad - Jet Black.

Back again with a LWD Design Team post.  This project is a cute little favor you can make up for your Easter table or give out as a "Welcome Spring" gift.  It's fast and easy to make and so inexpensive, you can make them for all your friends and family.  I used two staples available from Lone Wolf Designs:
I love this set!   Tim Holtz is my favorite designer and this bird is so spring-y!  

By using StazOn ink on this project, you get a water proof image...perfect for using with Mod Podge.  

Supplies:

  • Peat Pots (Get them at Wal-Mart.  12 for $1.59)
  • 6" Skewer stick 
  • 2.5" x 3" piece of cardstock
  • 23" cording or ribbon
  • hot glue
  • Acrylic paint  (I used a dusty pink color--Delta Indiana Rose)
  • Bird stamp from Stampers Anonymous Tim Holtz Cling Mounted Stamps - Urban Tapestry
  • Tsukineko - StazOn Pad - Jet Black.
  • Tissue paper
  • Mod Podge
  • Spanish Moss
  • Hot glue gun, paint brush, scissors, sentiment stamp, hole punch

Instructions:

  • Paint the outside, bottom and inside lip of the peat pot and the skewer stick with acrylic paint.  Put on only one coat...you want a shabby look.  Let dry.
  • Using StazOn ink, stamp bird on tissue paper.  Cut out design as close to the stamped image as possible.
  • Once pot is dry, add a good coat of Mod Podge to the pot where the image is to be placed.  I used my finger to apply the MP but you could use a foam brush.  Carefully press on the tissue paper image over the applied Mod Podge and GENTLY go over the image with more Mod Podge.  Then cover the entire pot with a coat of Mod Podge.  Let dry.
  • Attach skewer to pot with hot glue
  • To create the banner, cut in the "vee" on one edge and punch holes in the other.  Stamp cardstock with sentiment and place banner on skewer.
  • Tie on cording and fill with Spanish moss.  


Here I also made a favor specifically for Easter.  Fill these favors with candy, decorative eggs or a little gift.
I hoped you enjoyed this project Showcase!  You can find the stamp and ink I used plus many other supplies for your crafting projects at 25% Off MSRP at Lone Wolf Designs, LLC.  All you have to do is join the LWD Discount Retail Sales Facebook group.  If you haven't joined us yet, you're paying too much for your craft supplies!